Ashley Cheung's Portfolio
- Engineering
- Art
- Resume
- Contact
My Projects
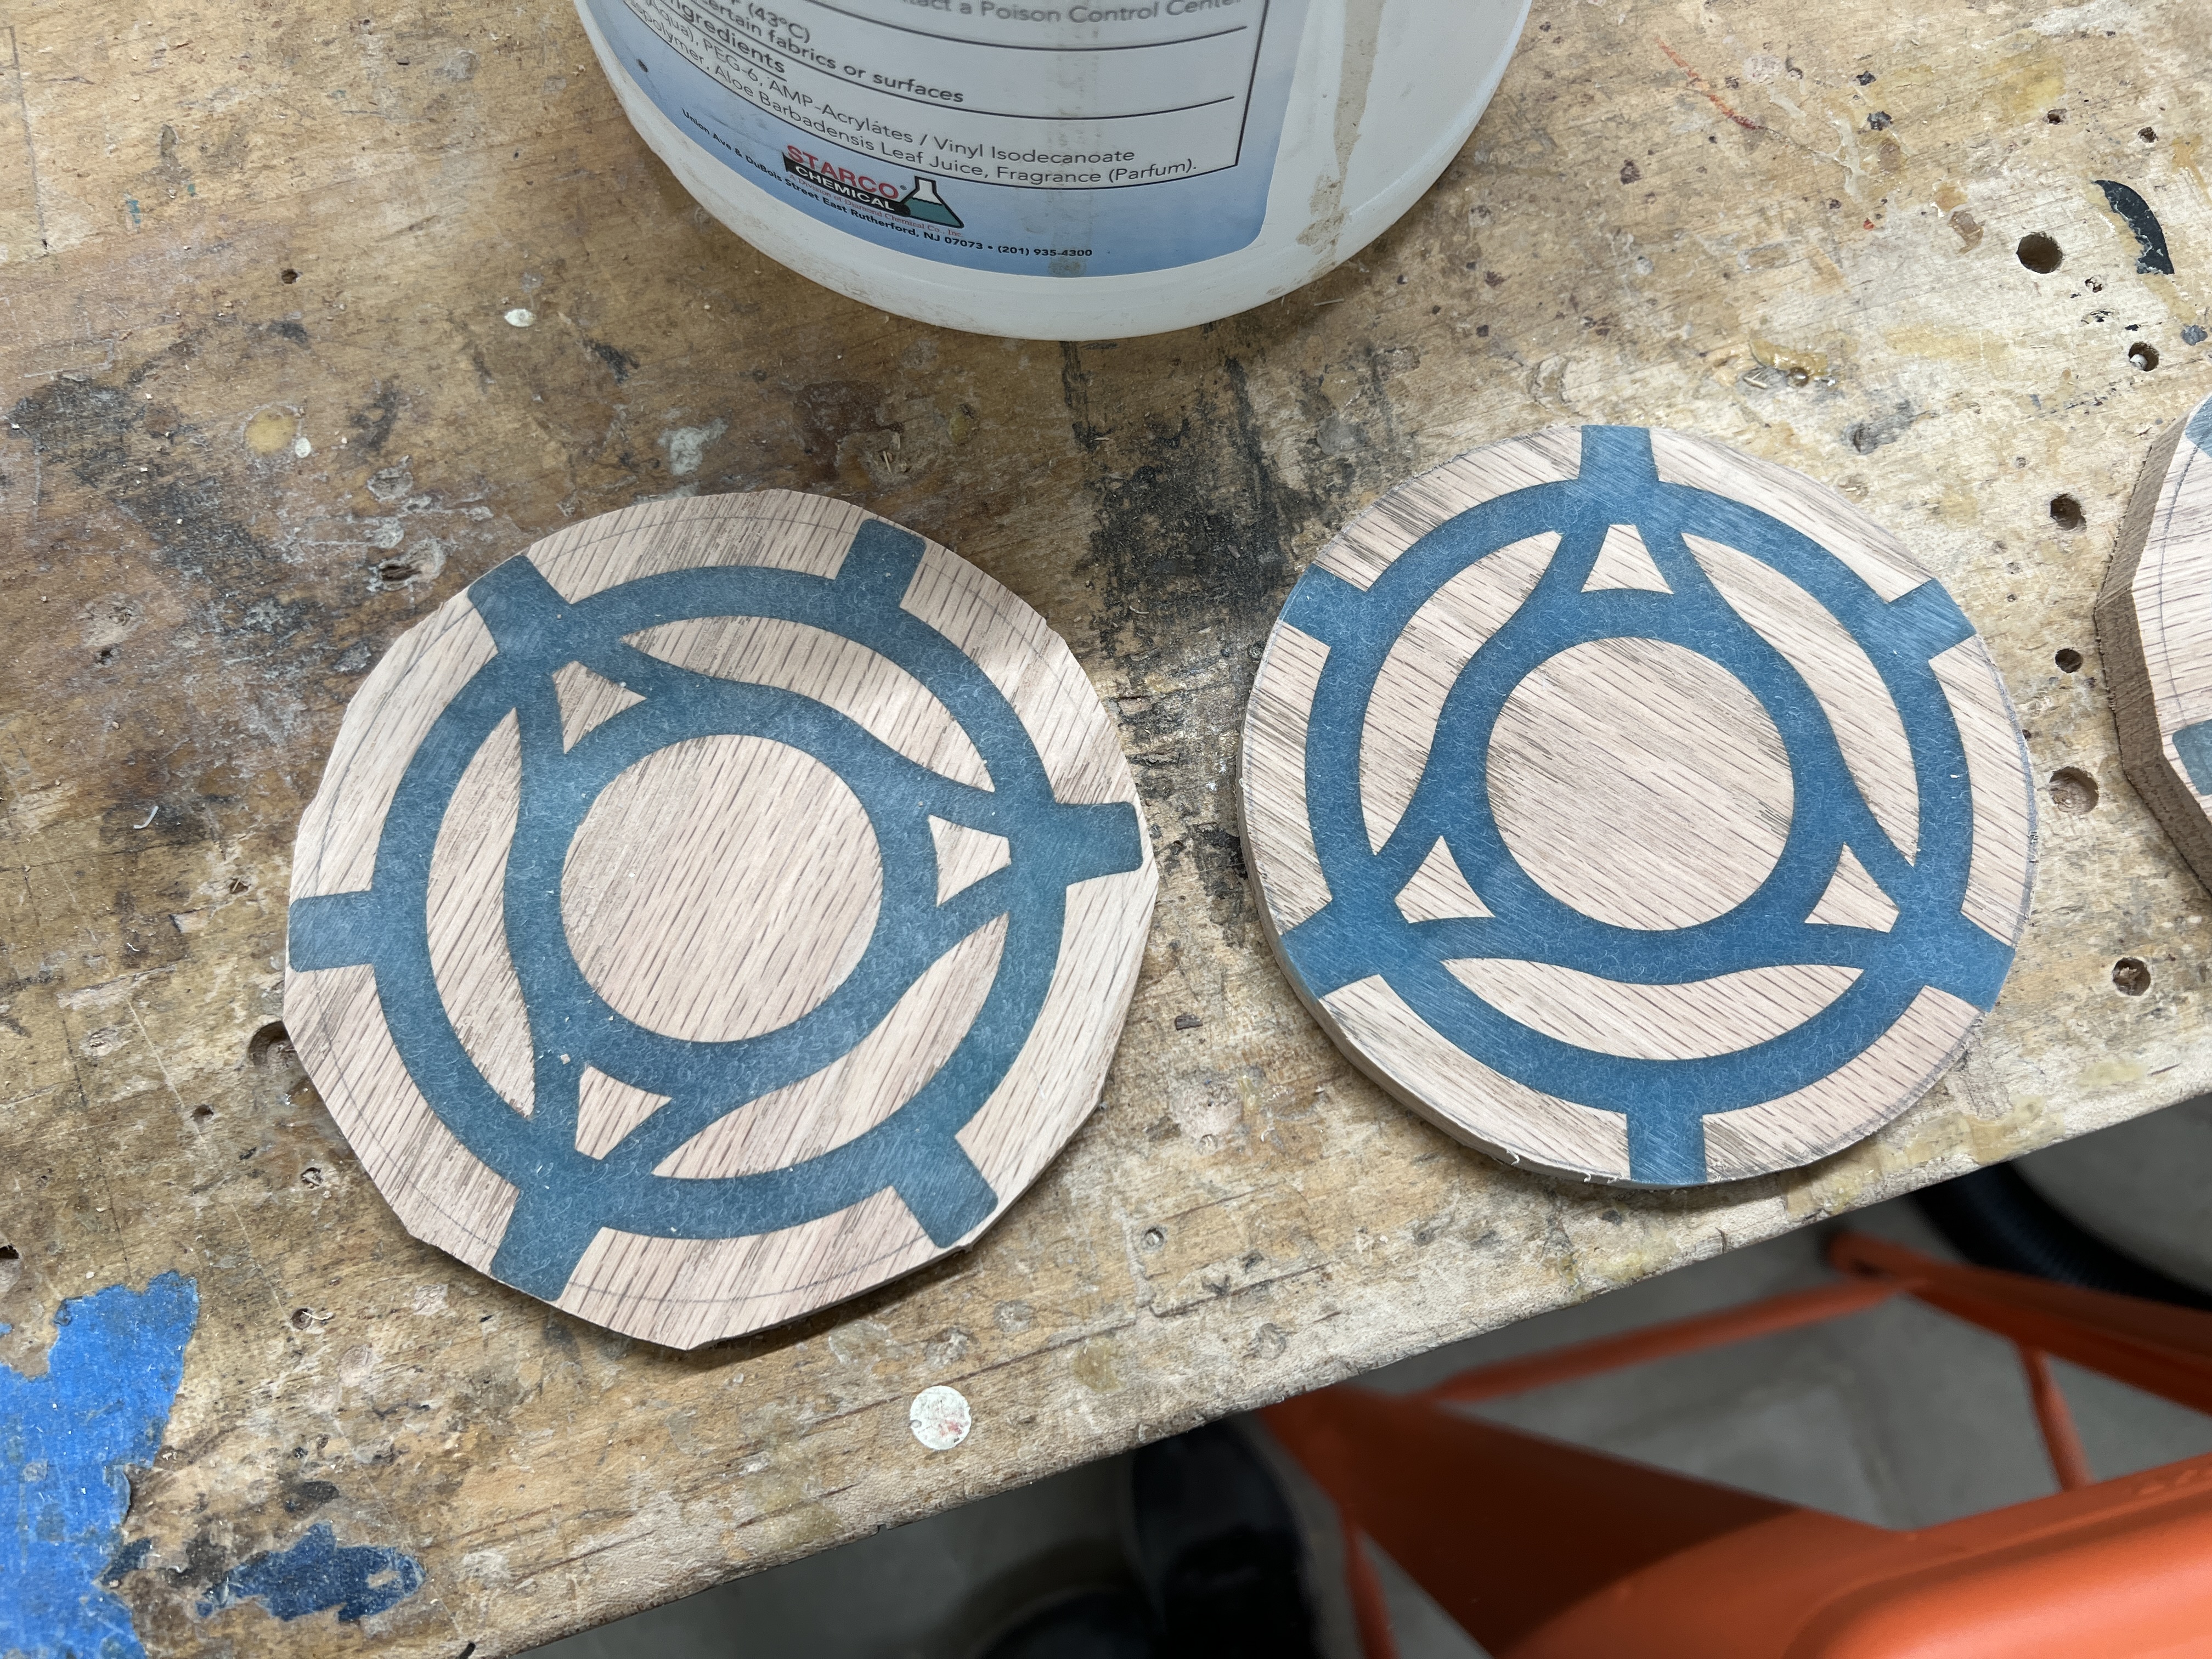
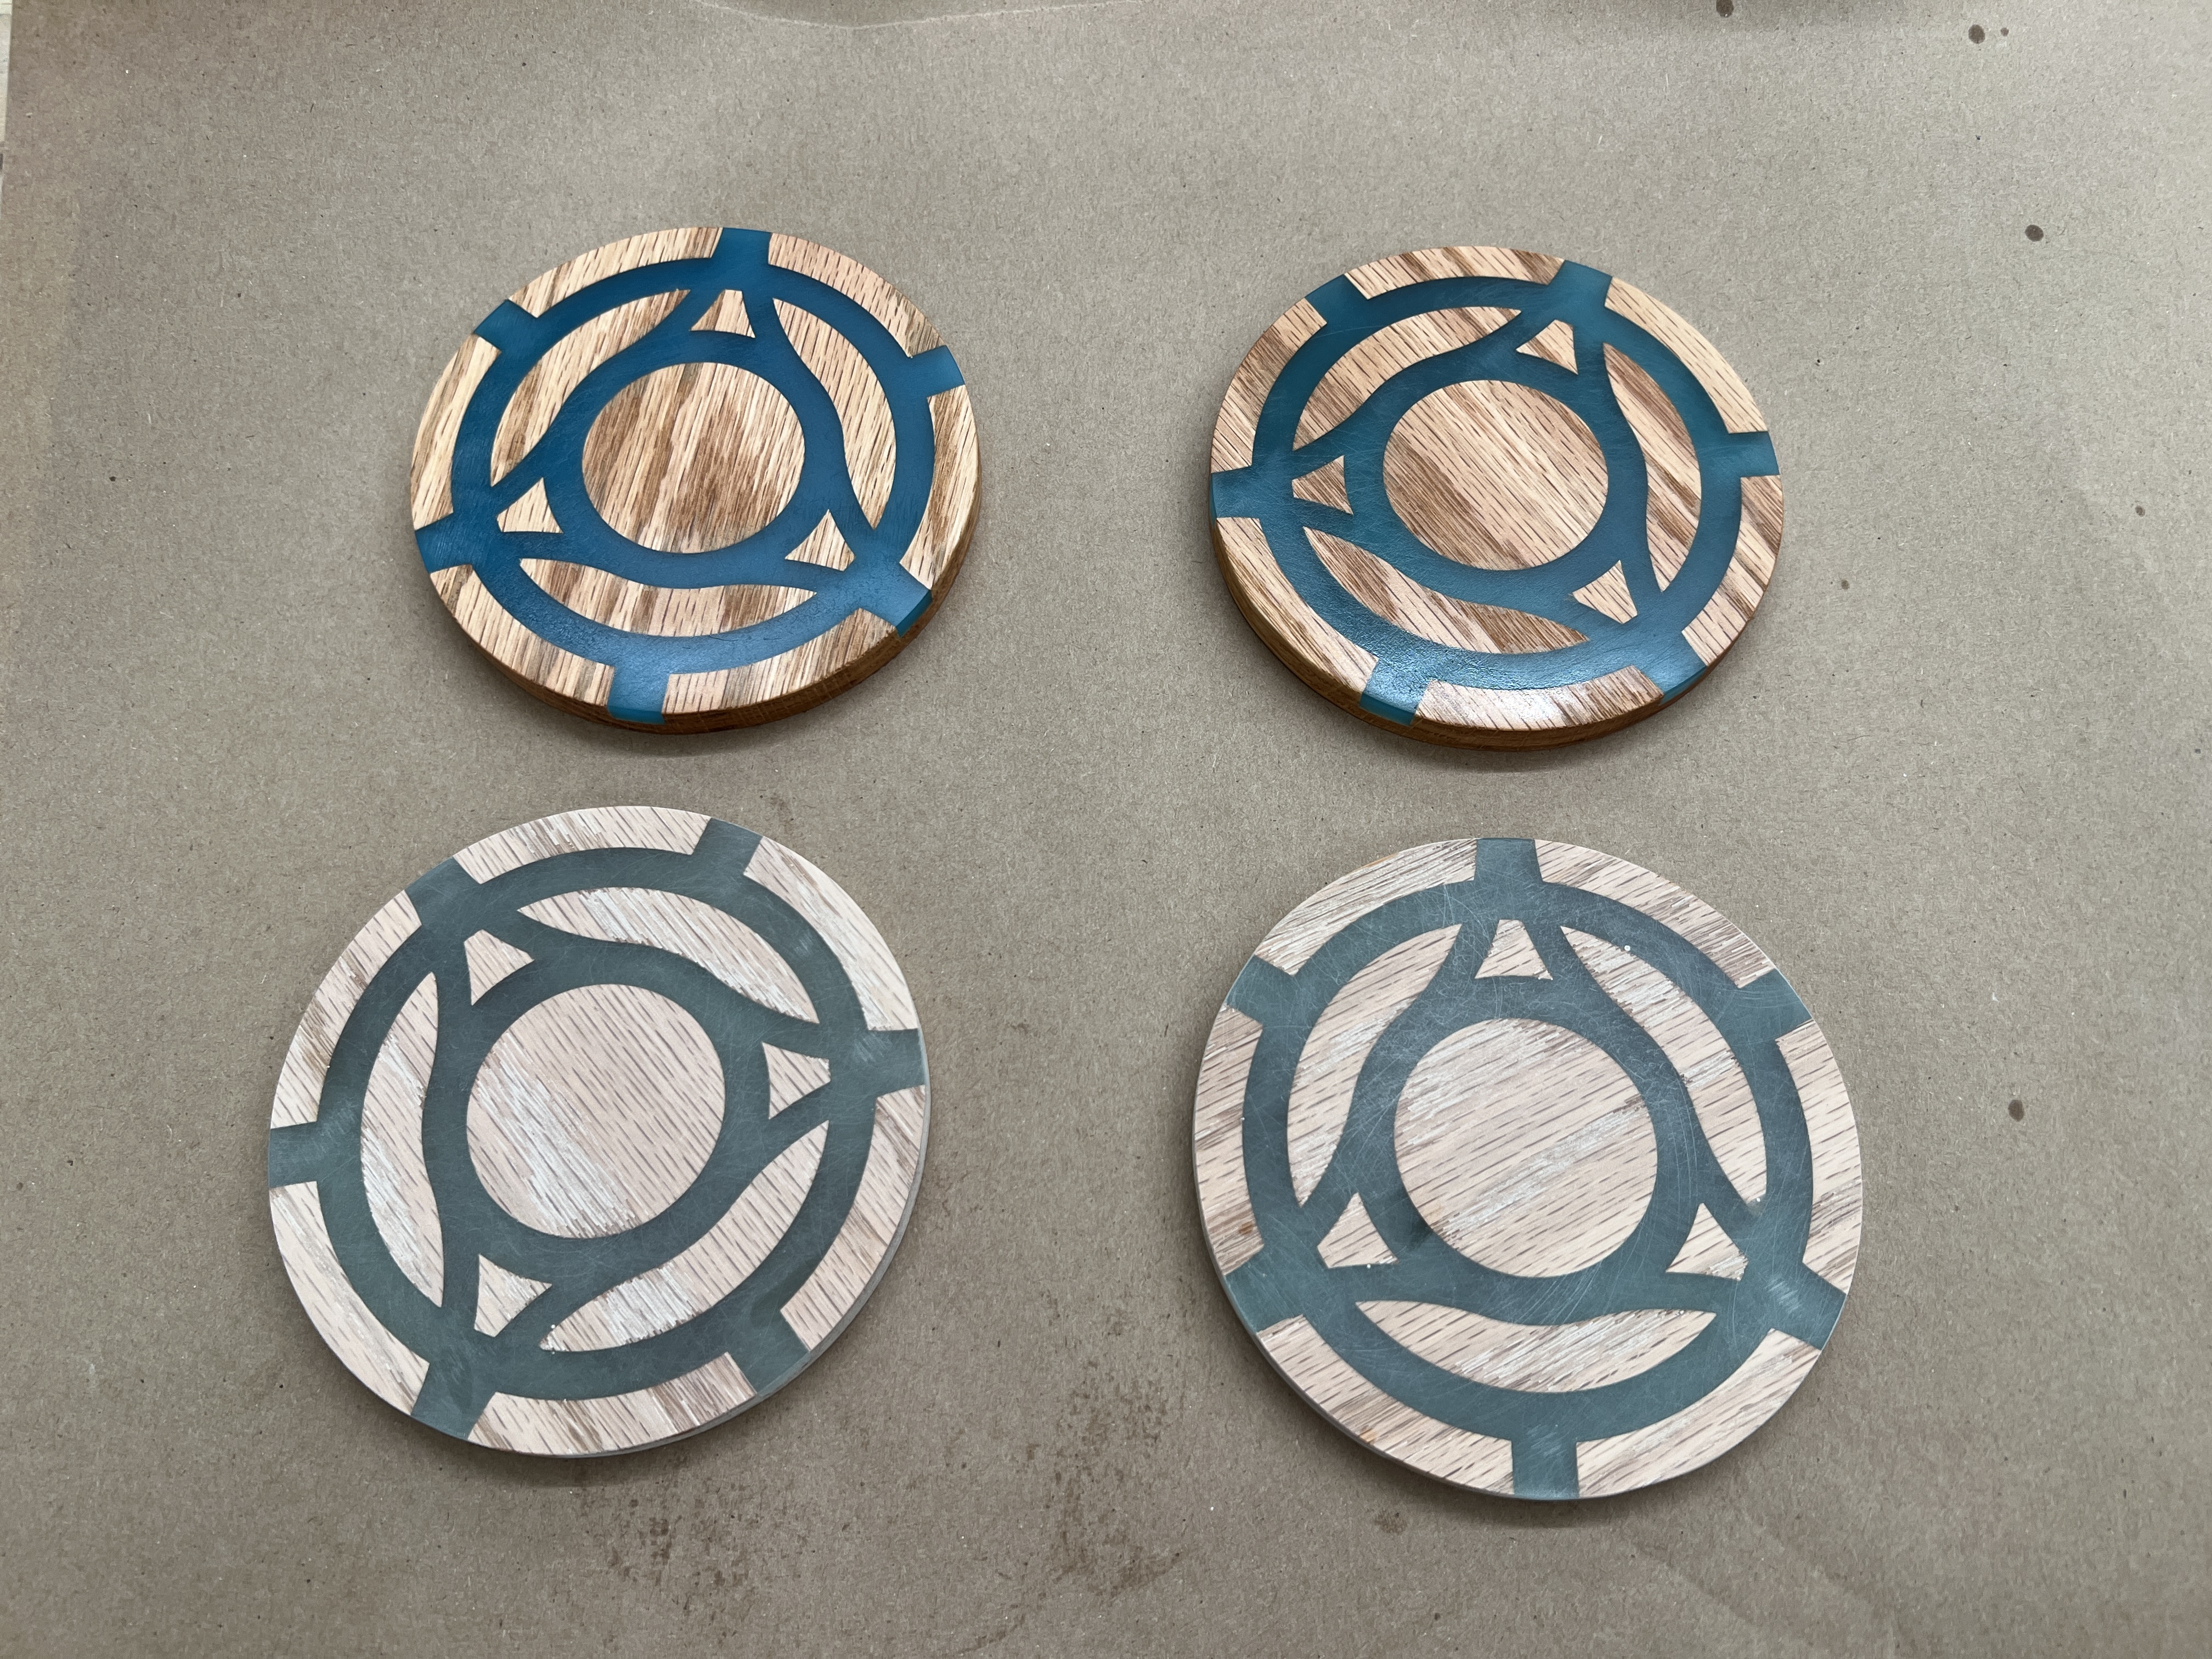
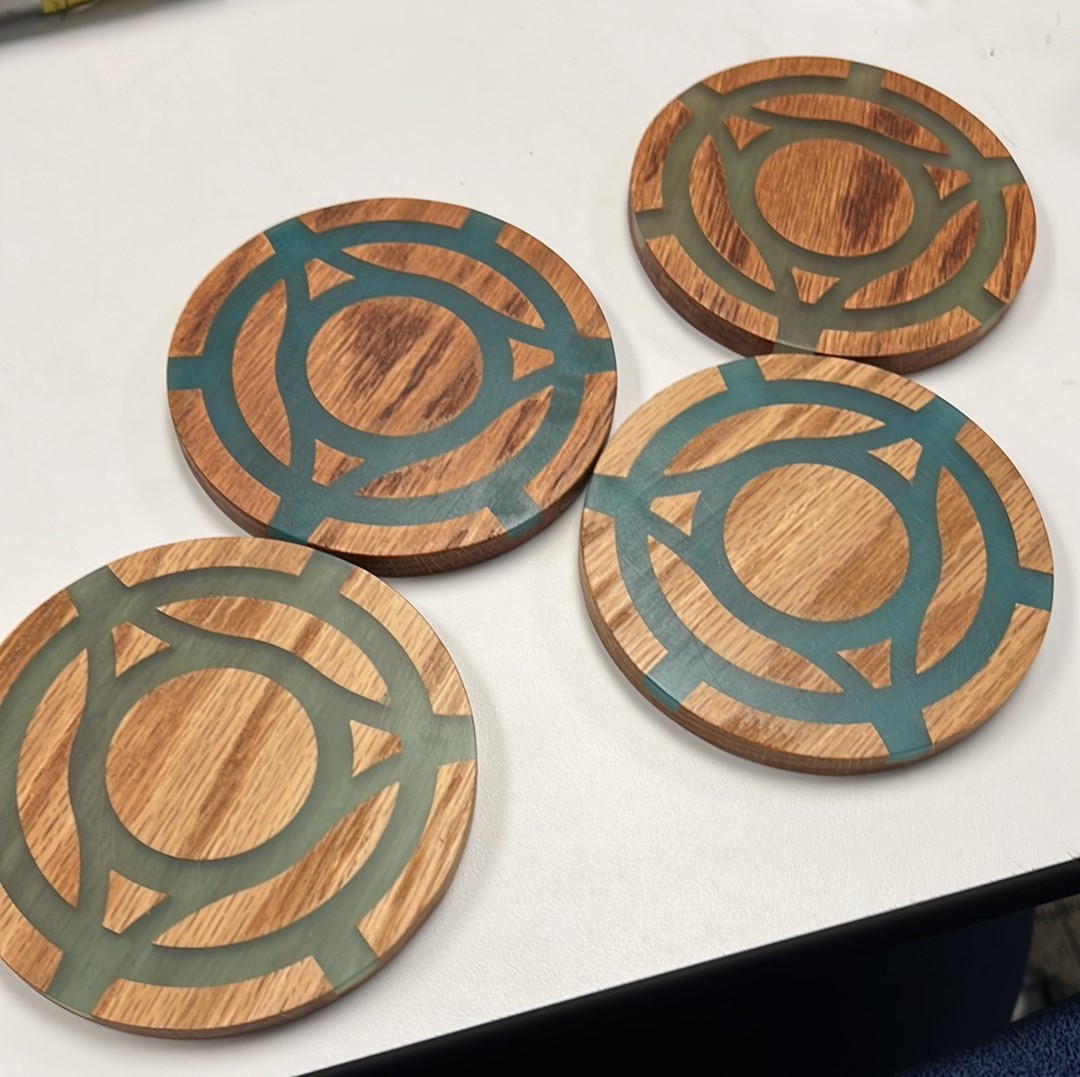
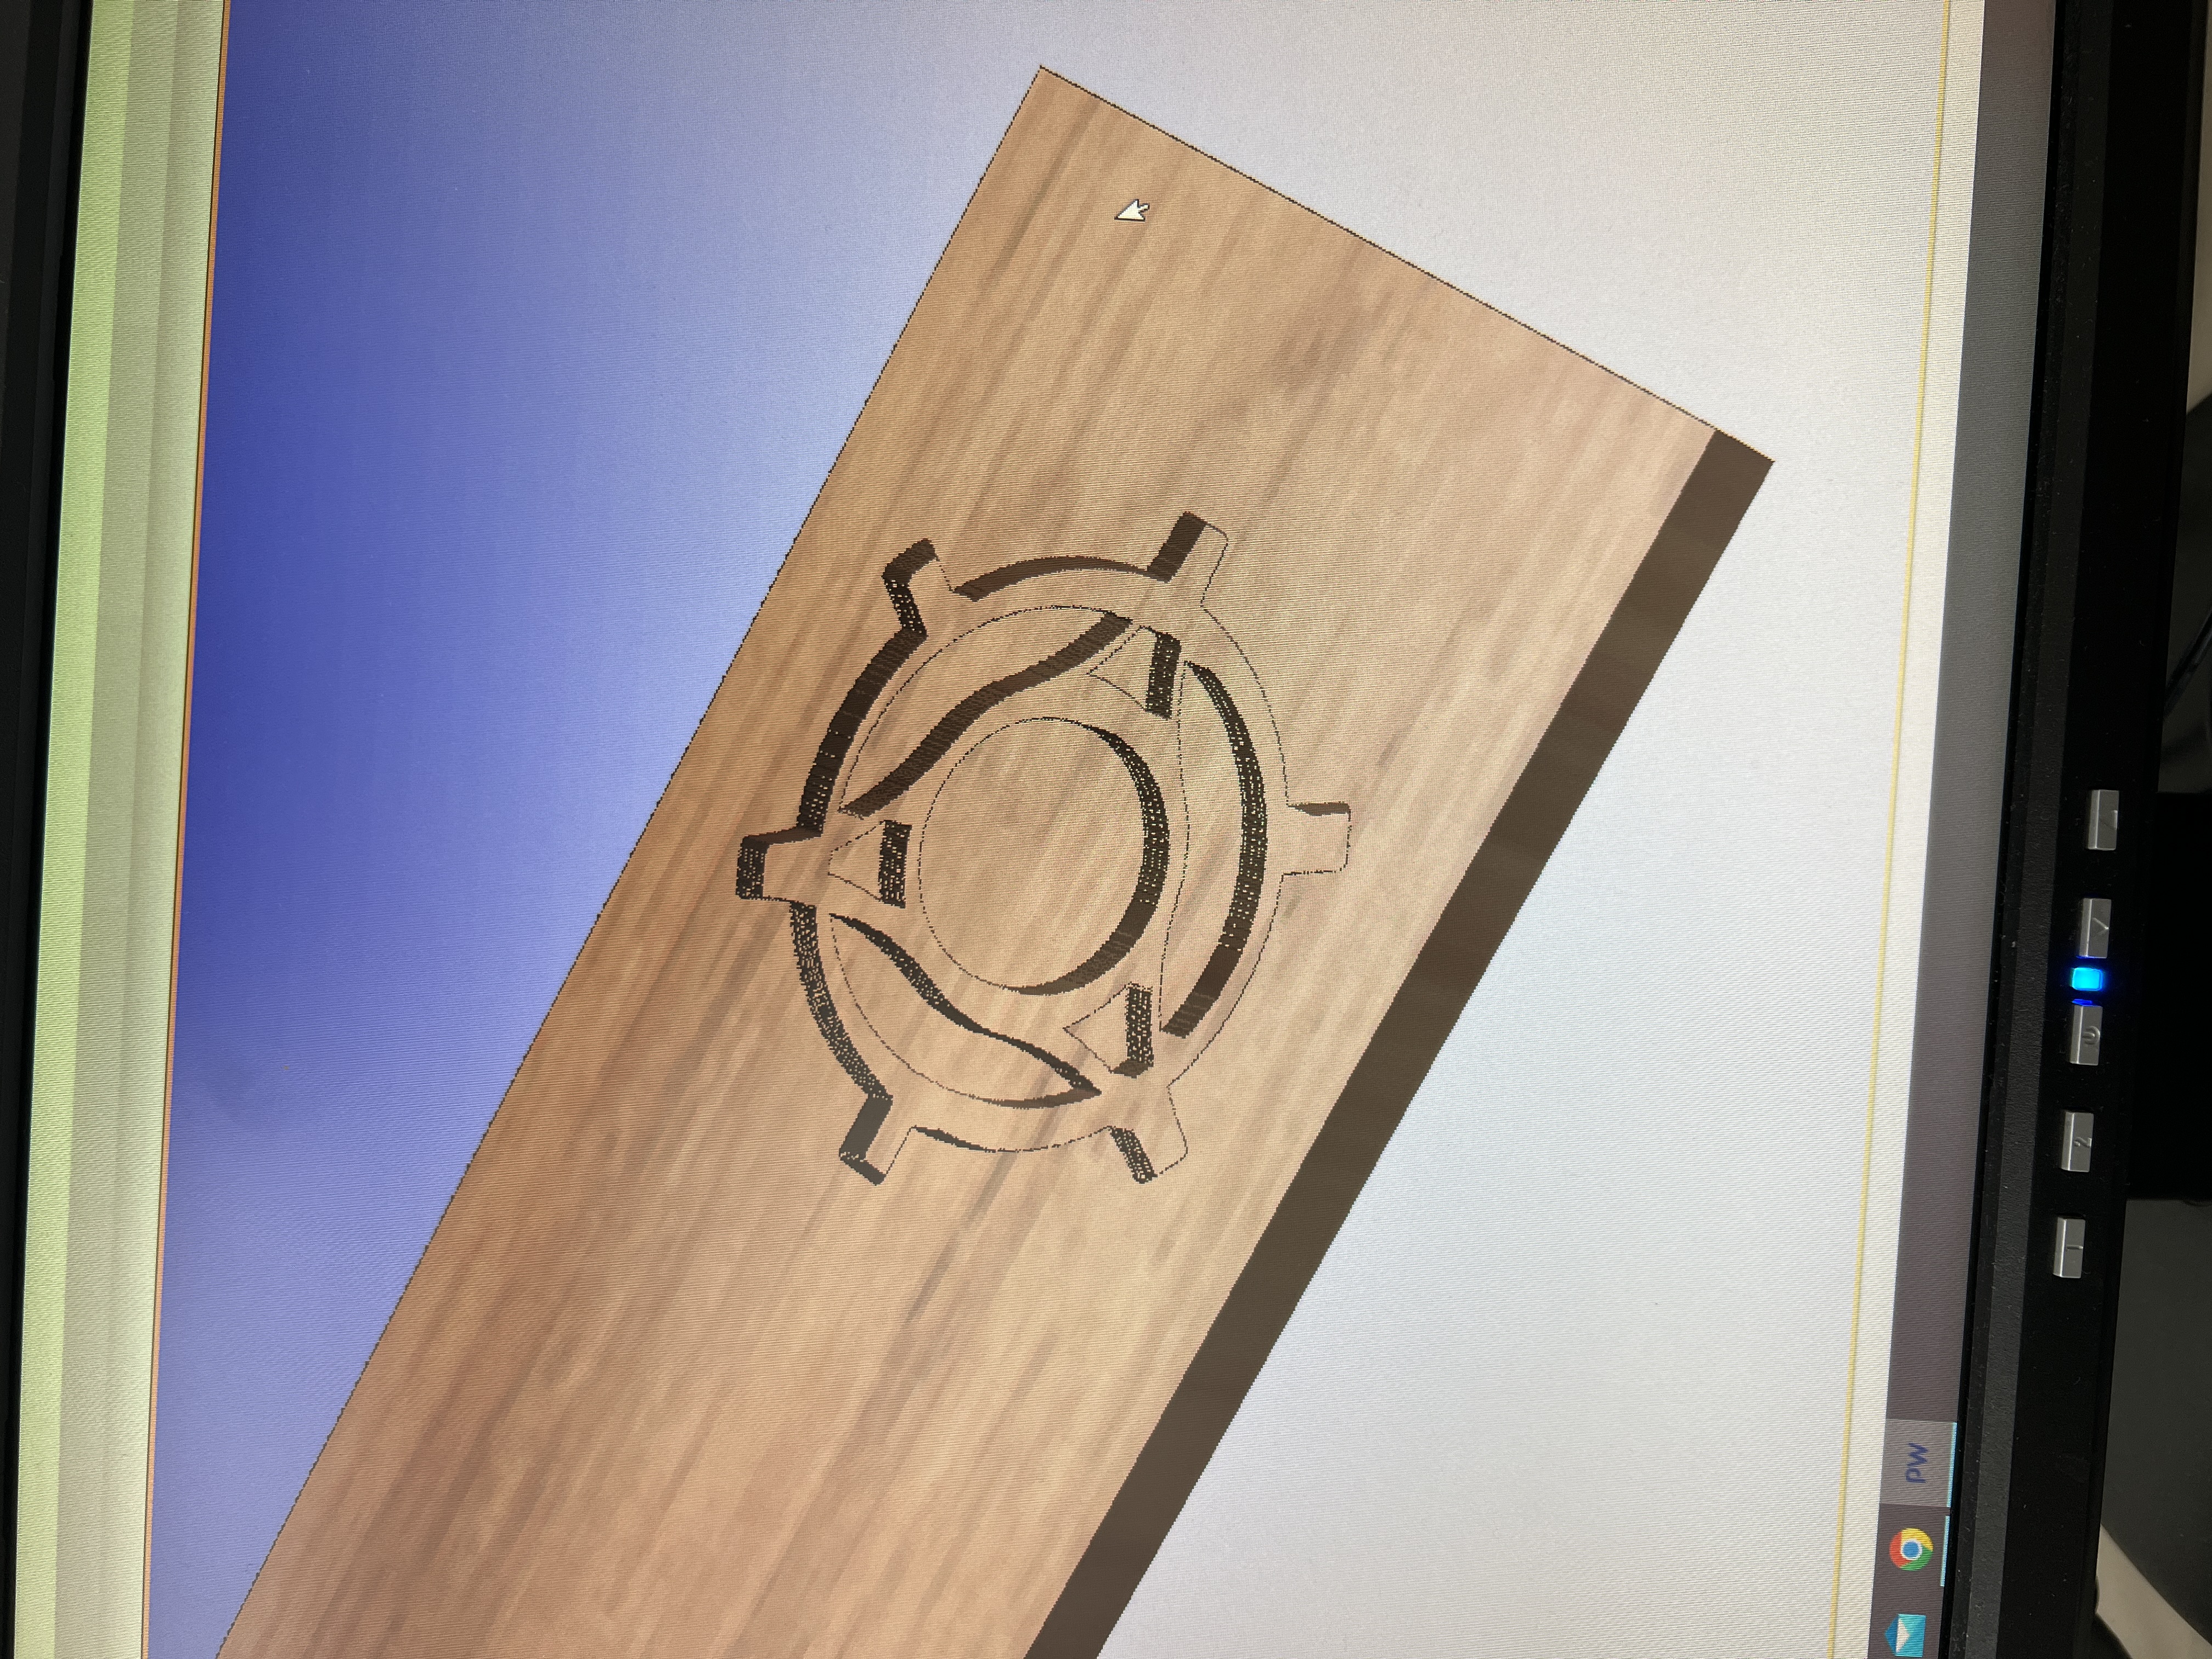
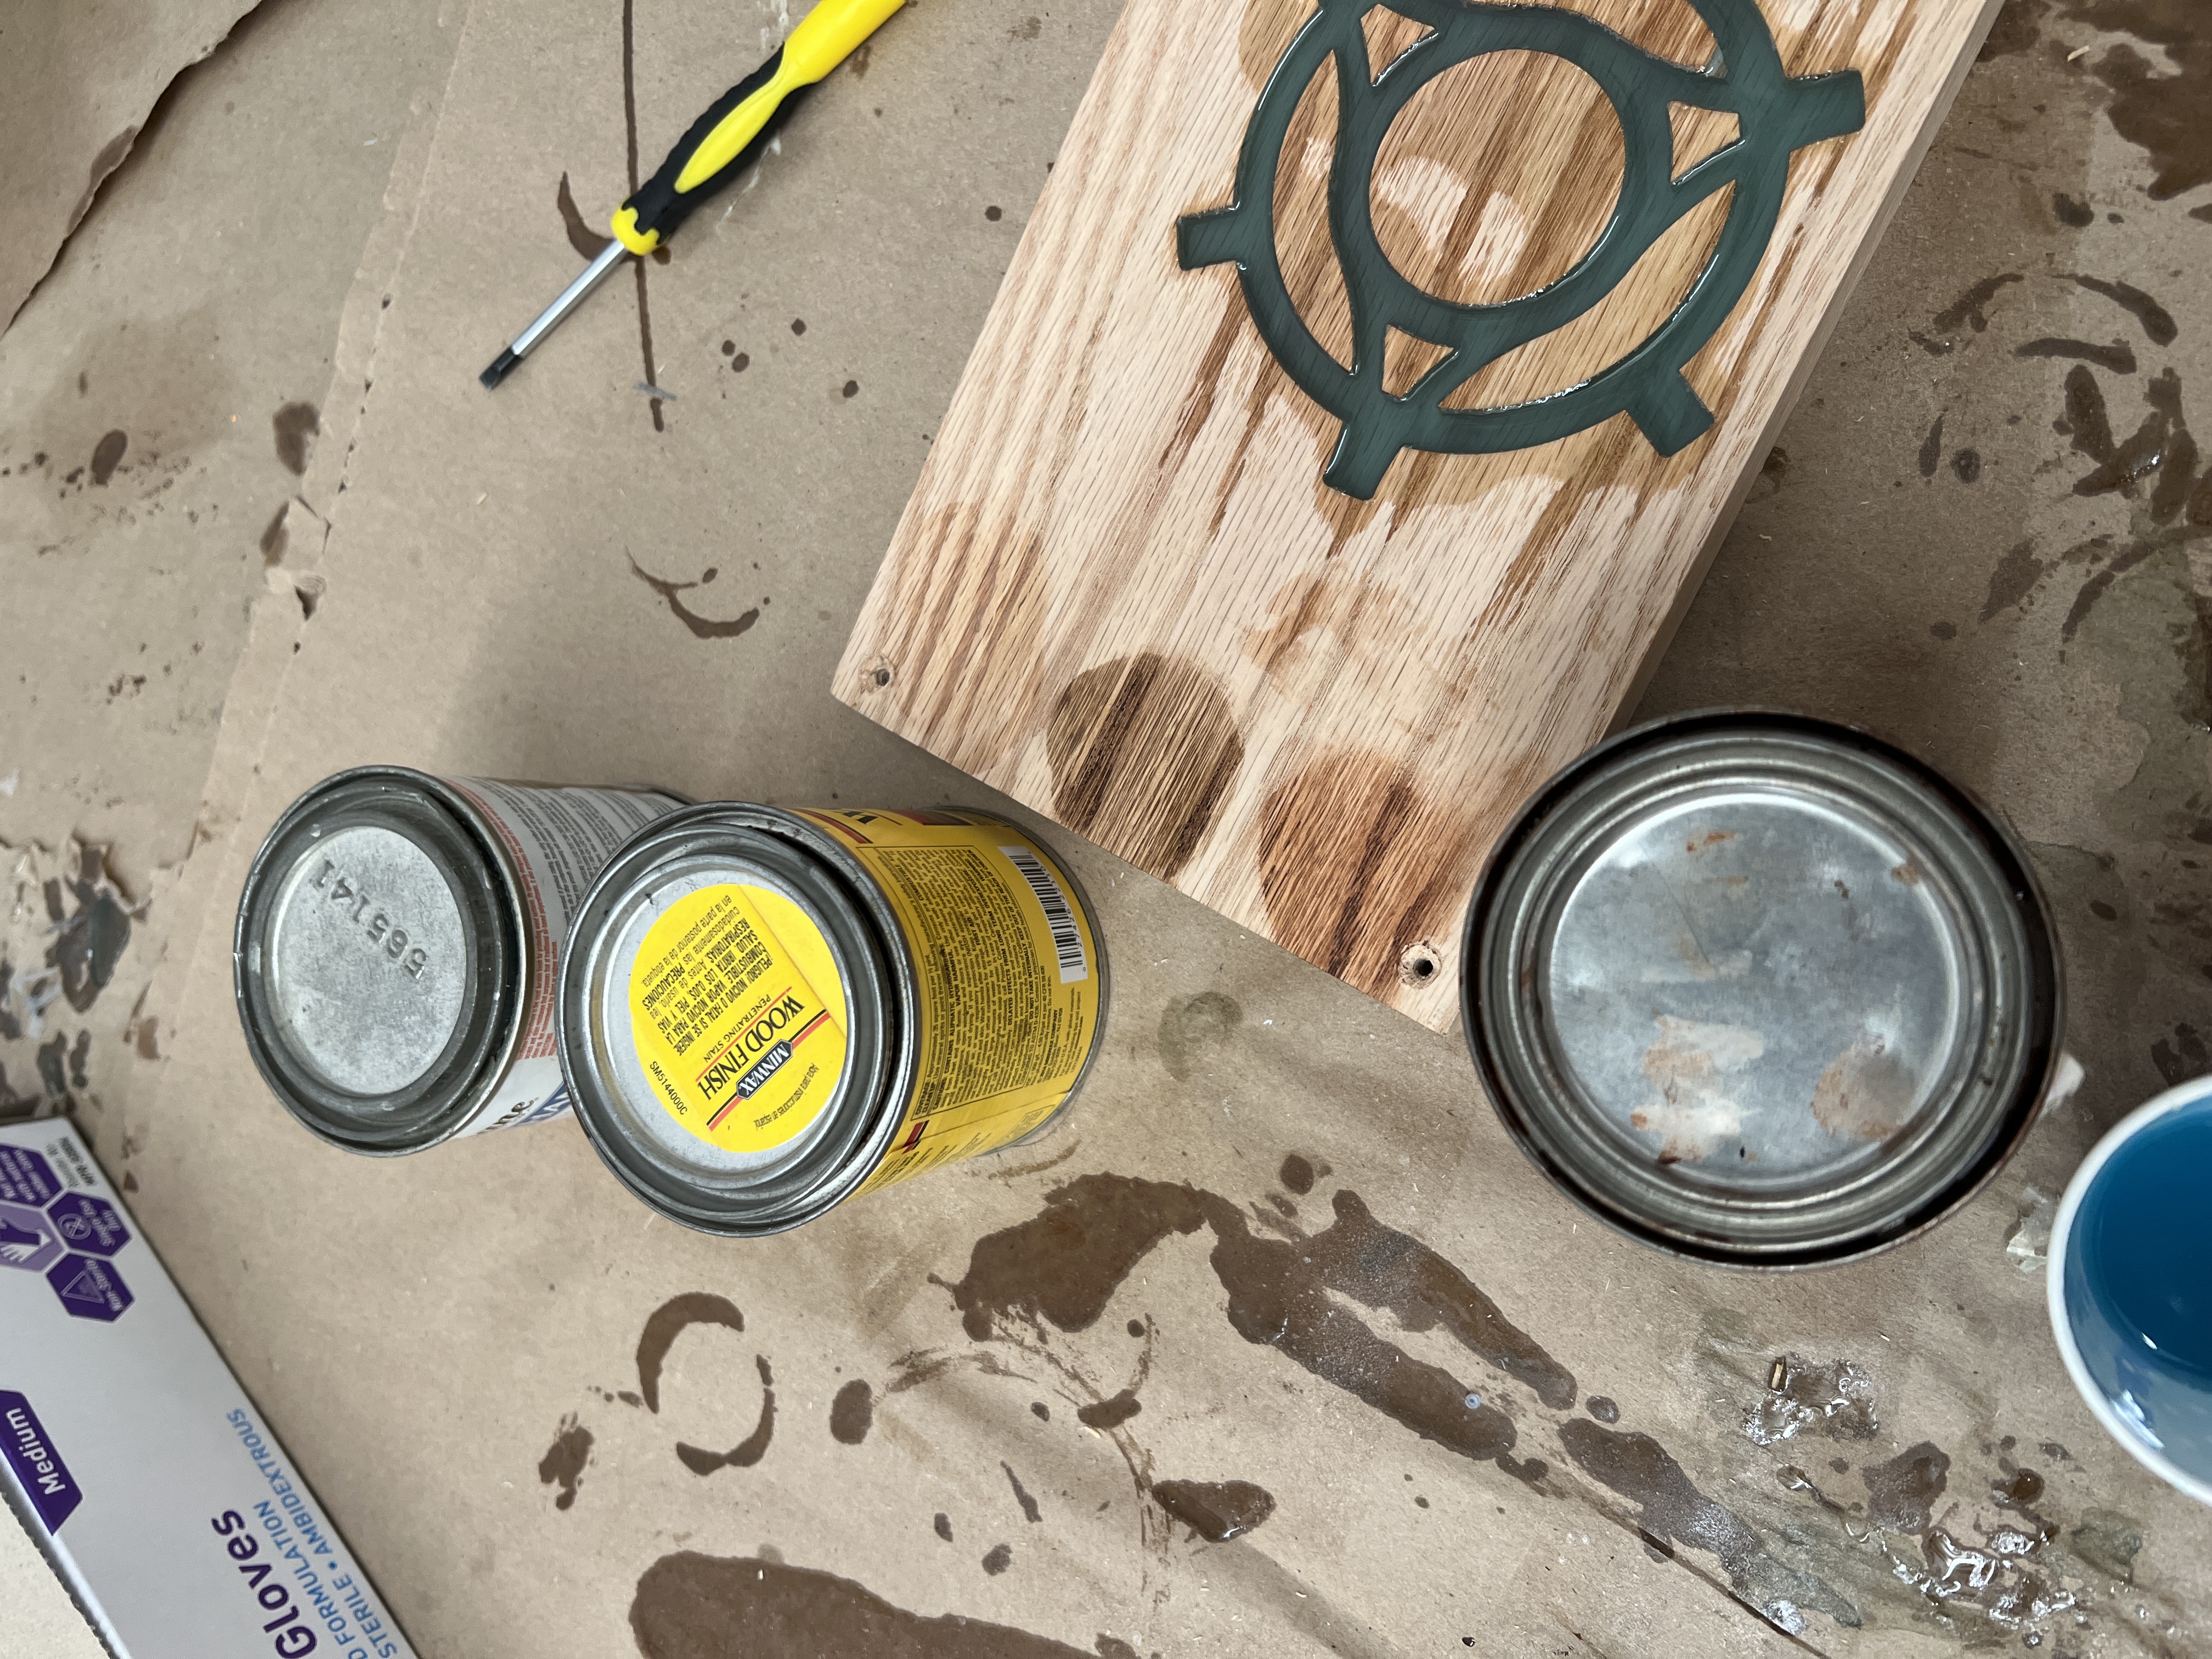
Coasters
Mar 2023
Using a ShopBot CNC router, I cut this coaster design out of a plank of red oak and filled in the gaps with epoxy. I sanded down the surface first, then marked out the edges of the circles with a laser cut guide. I cut them out with the bandsaw, then sanded down the edges so they were exactly circular. After a lot of sanding, I applied a wood stain and a protective polyurethane coating to finish them!
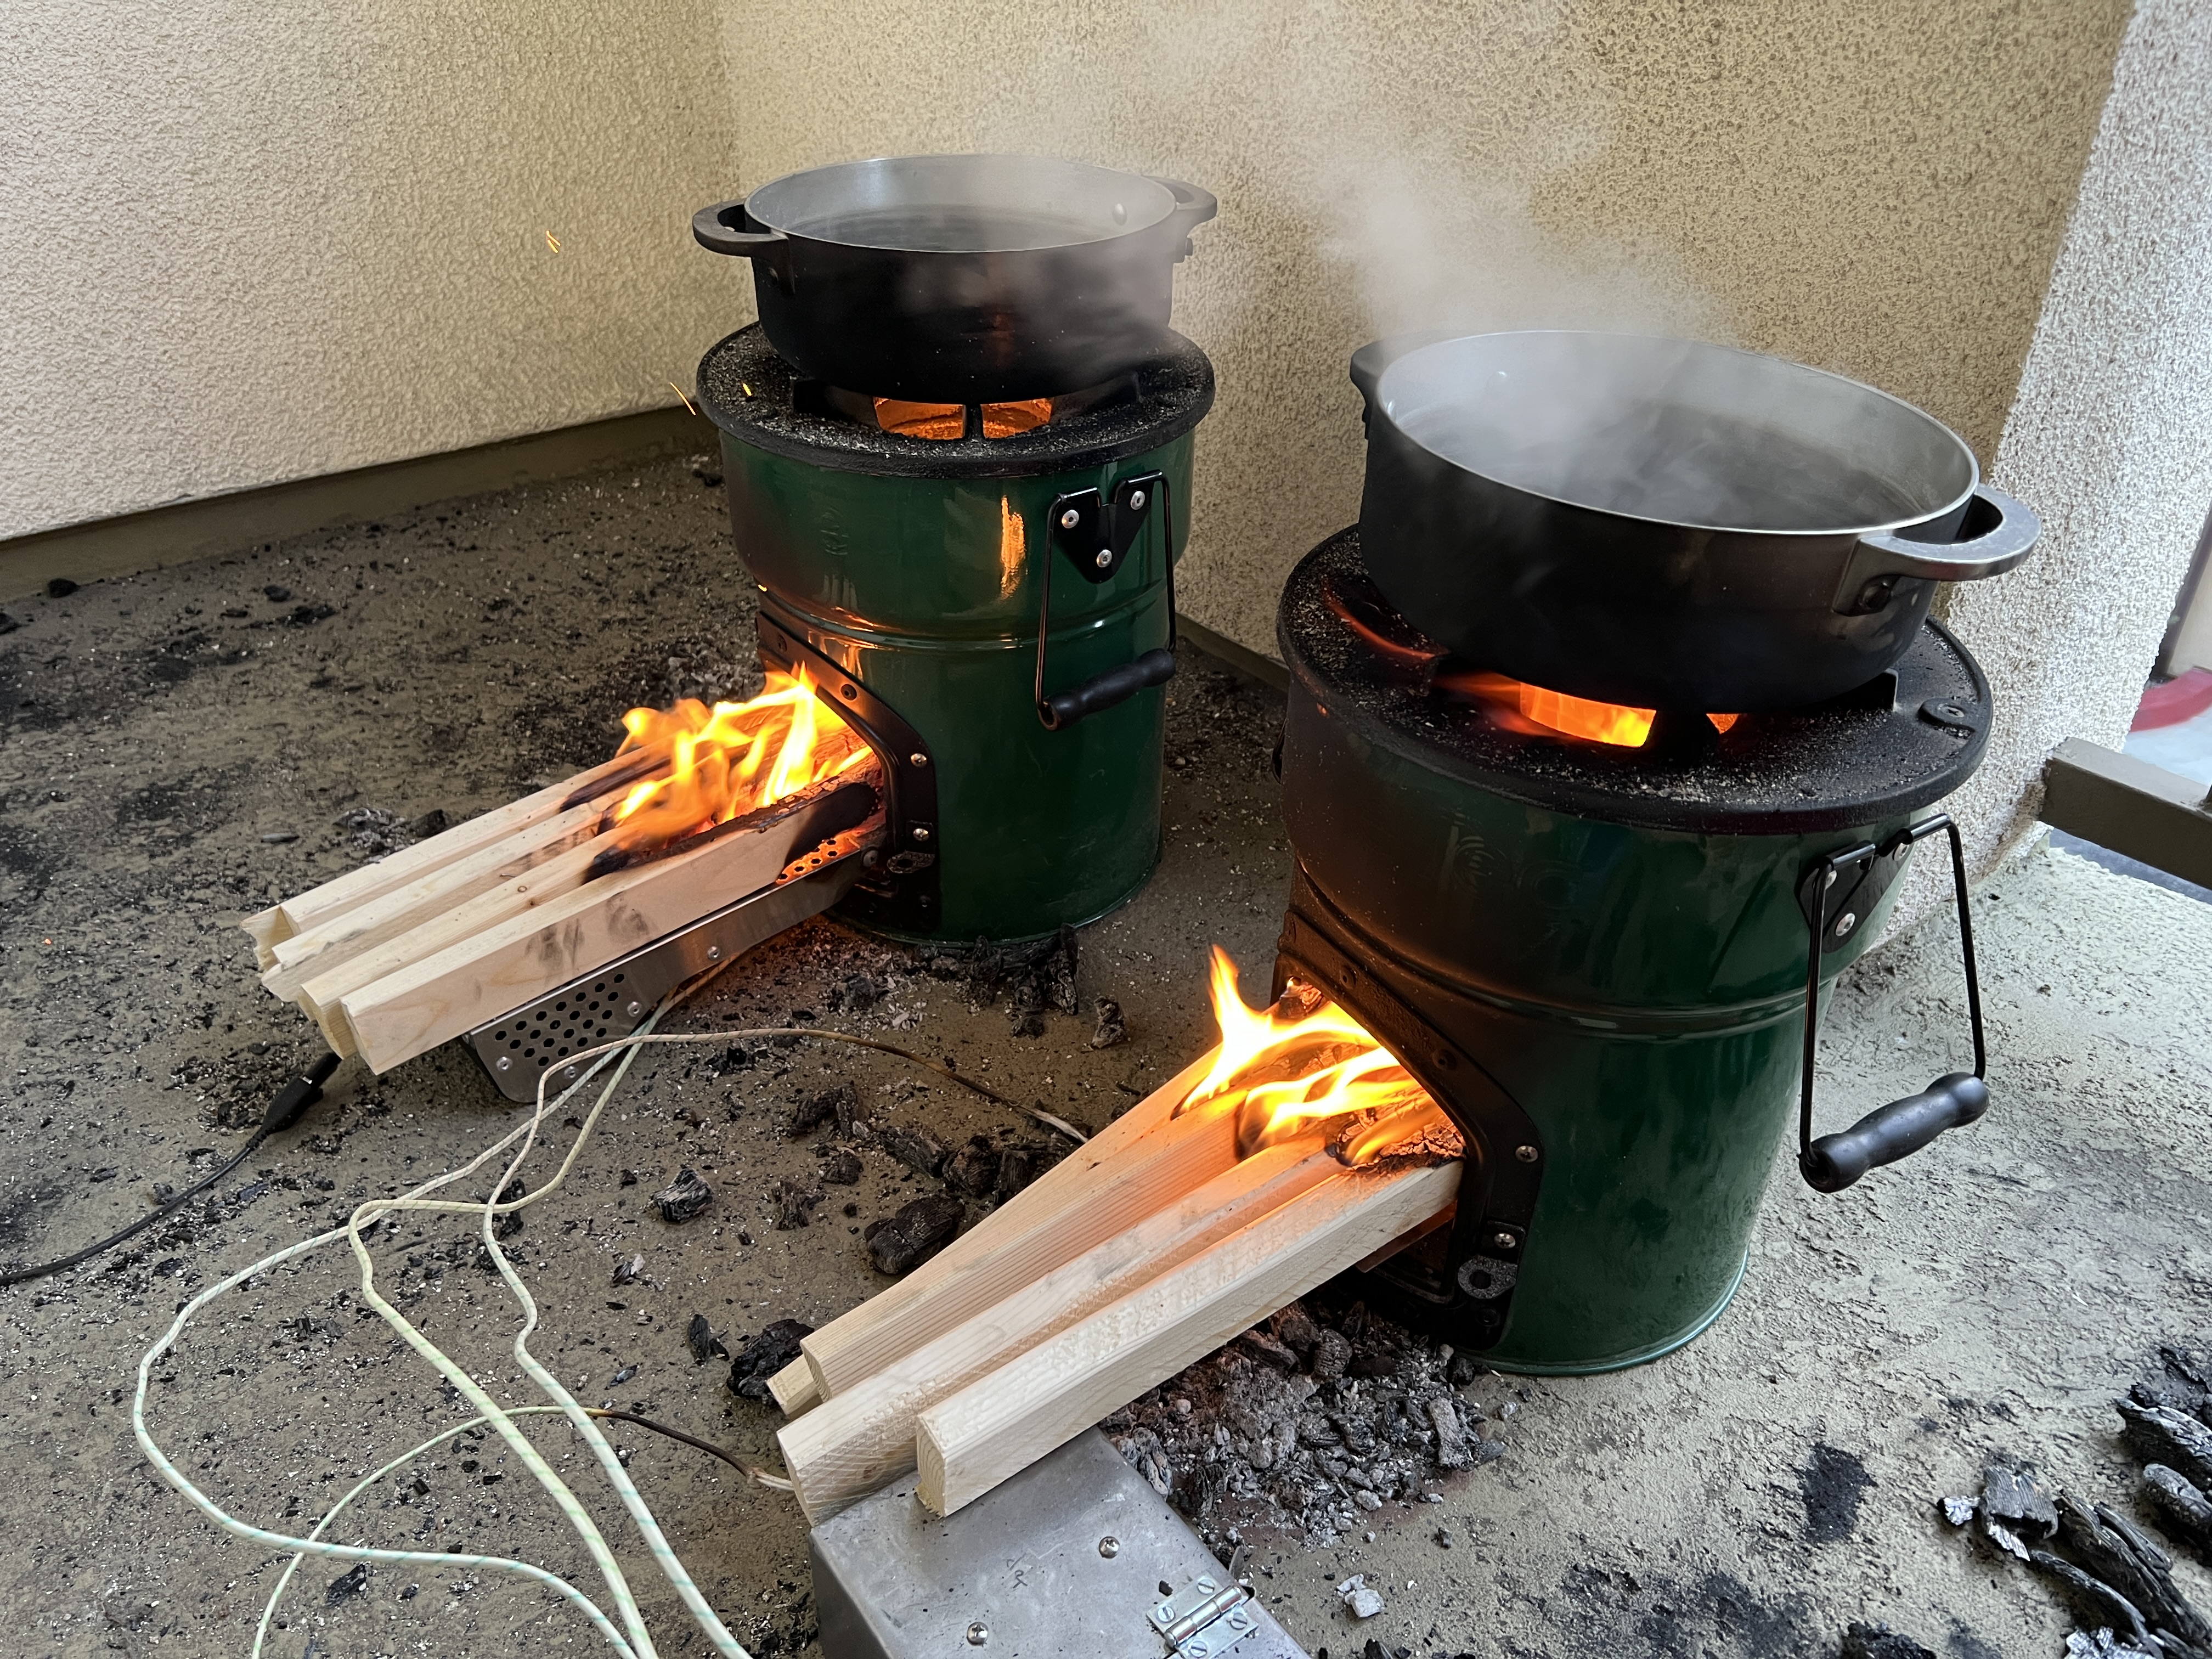
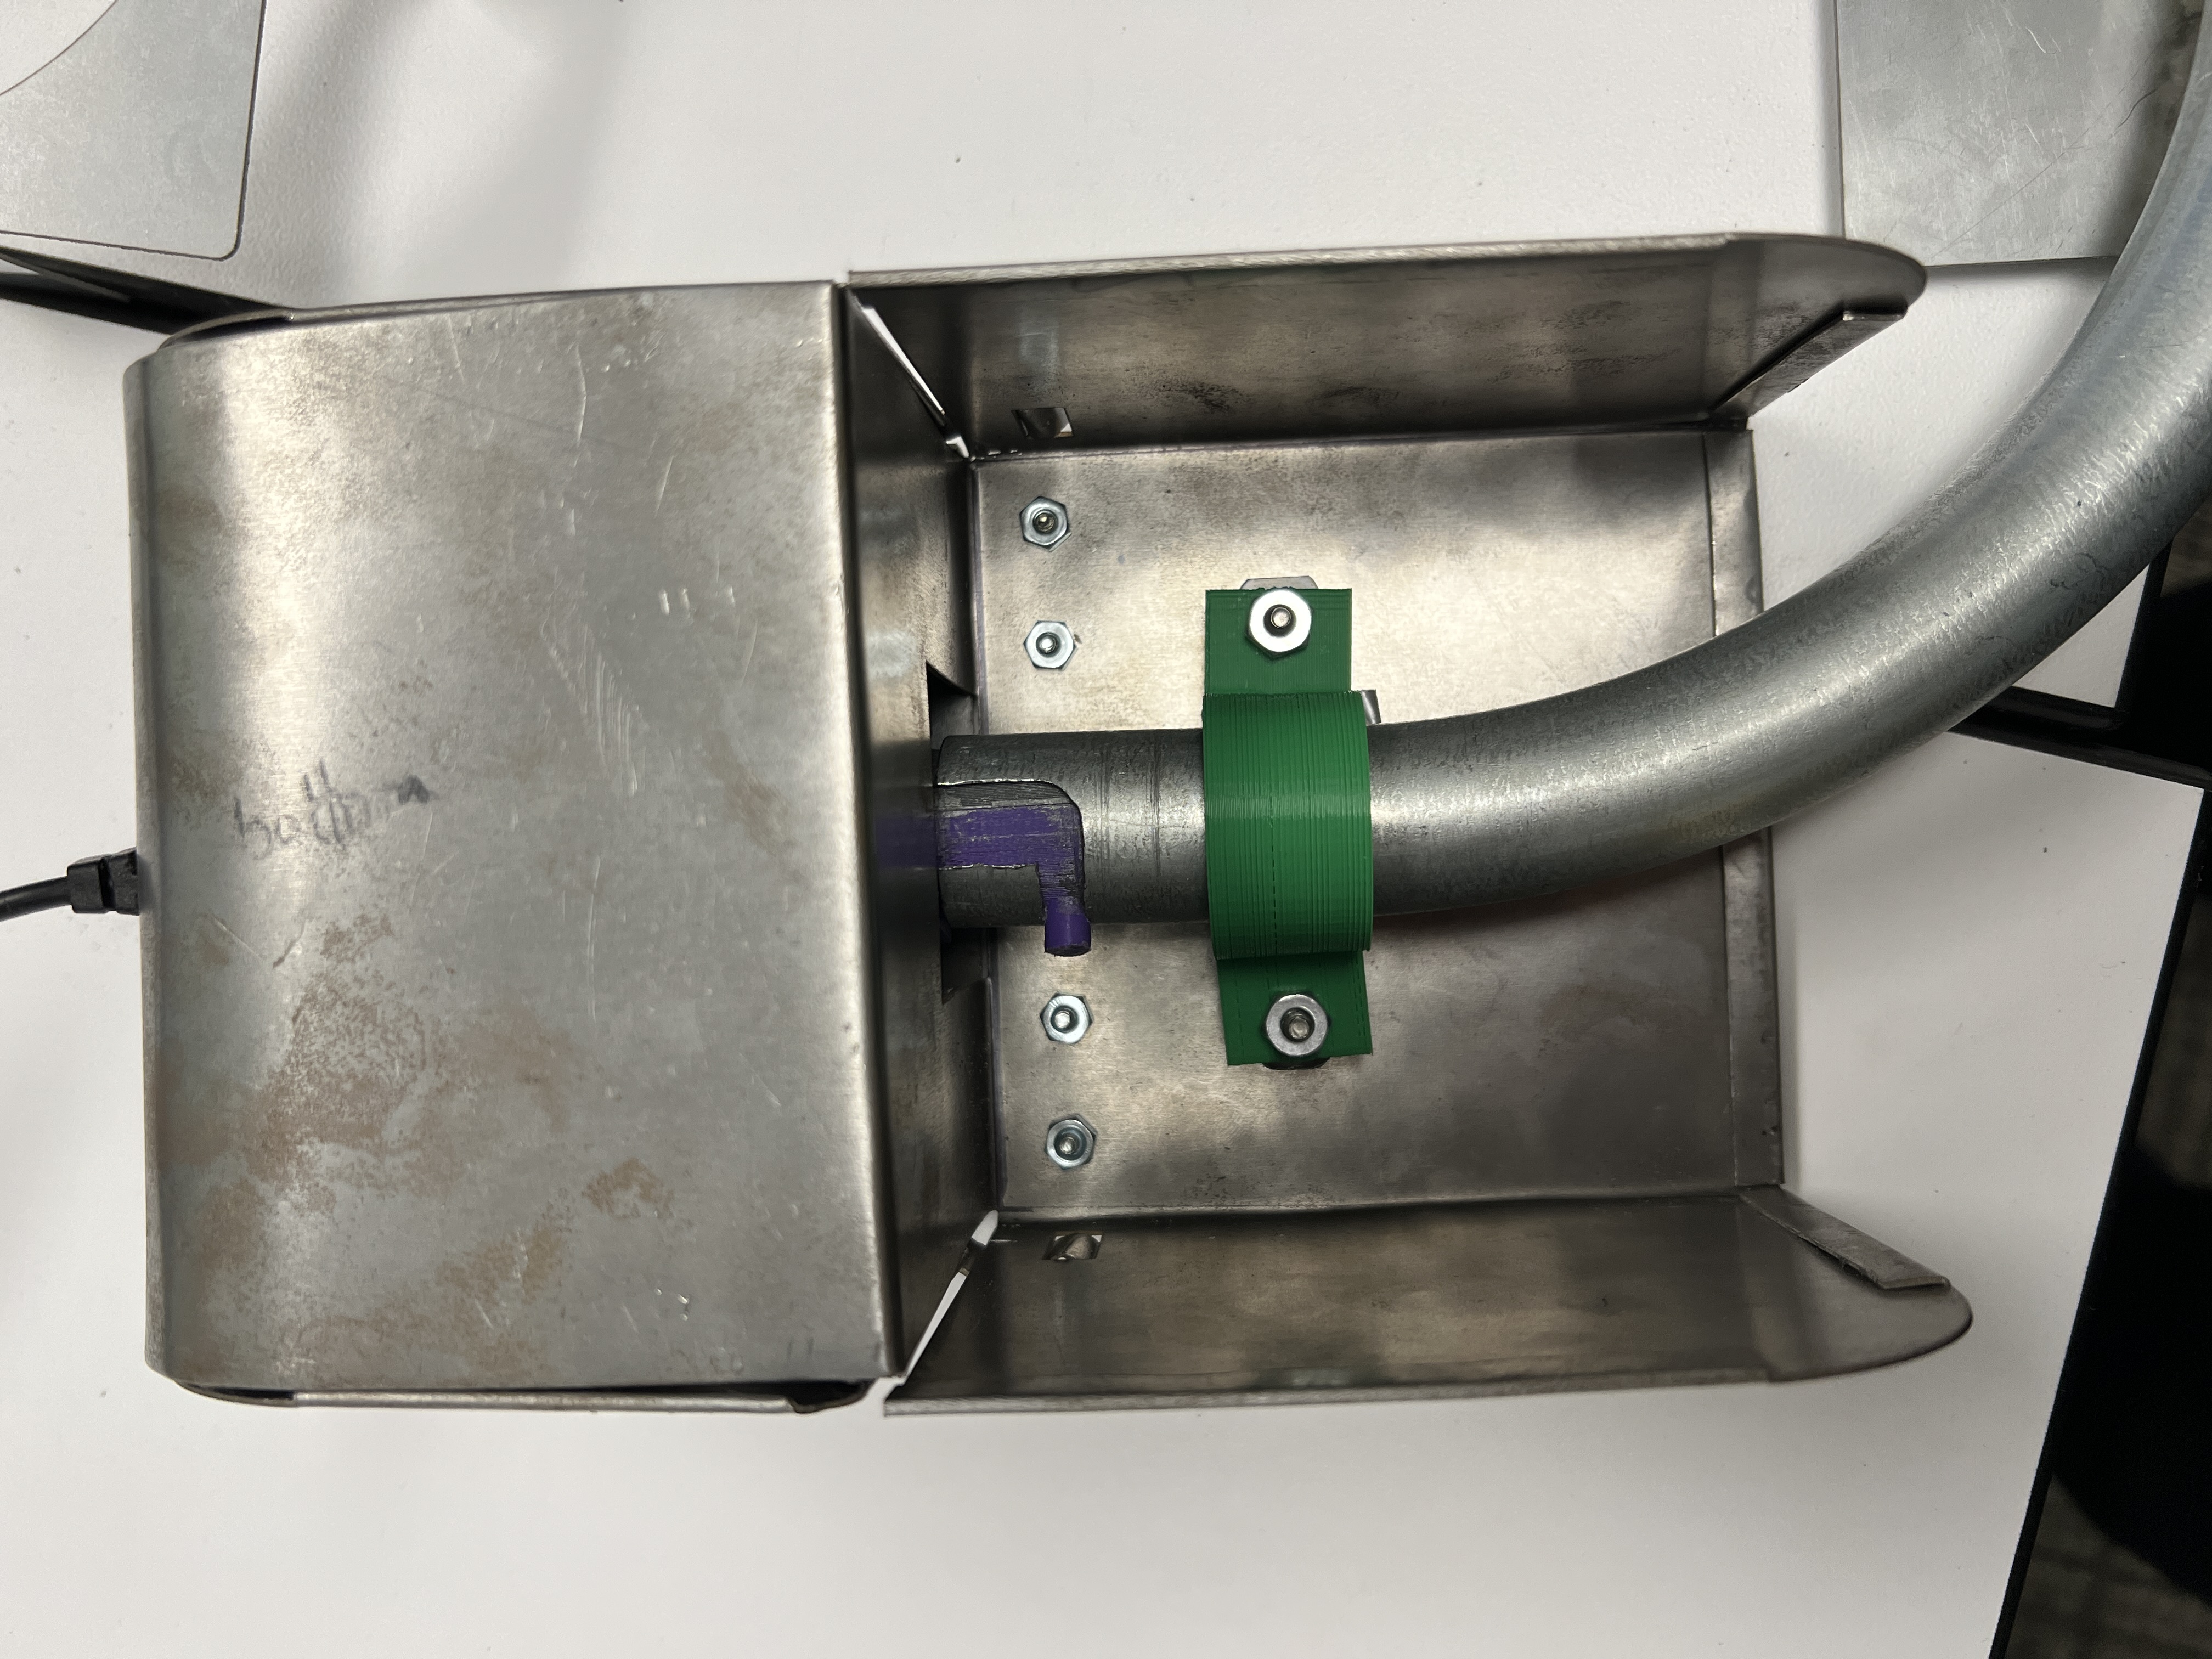
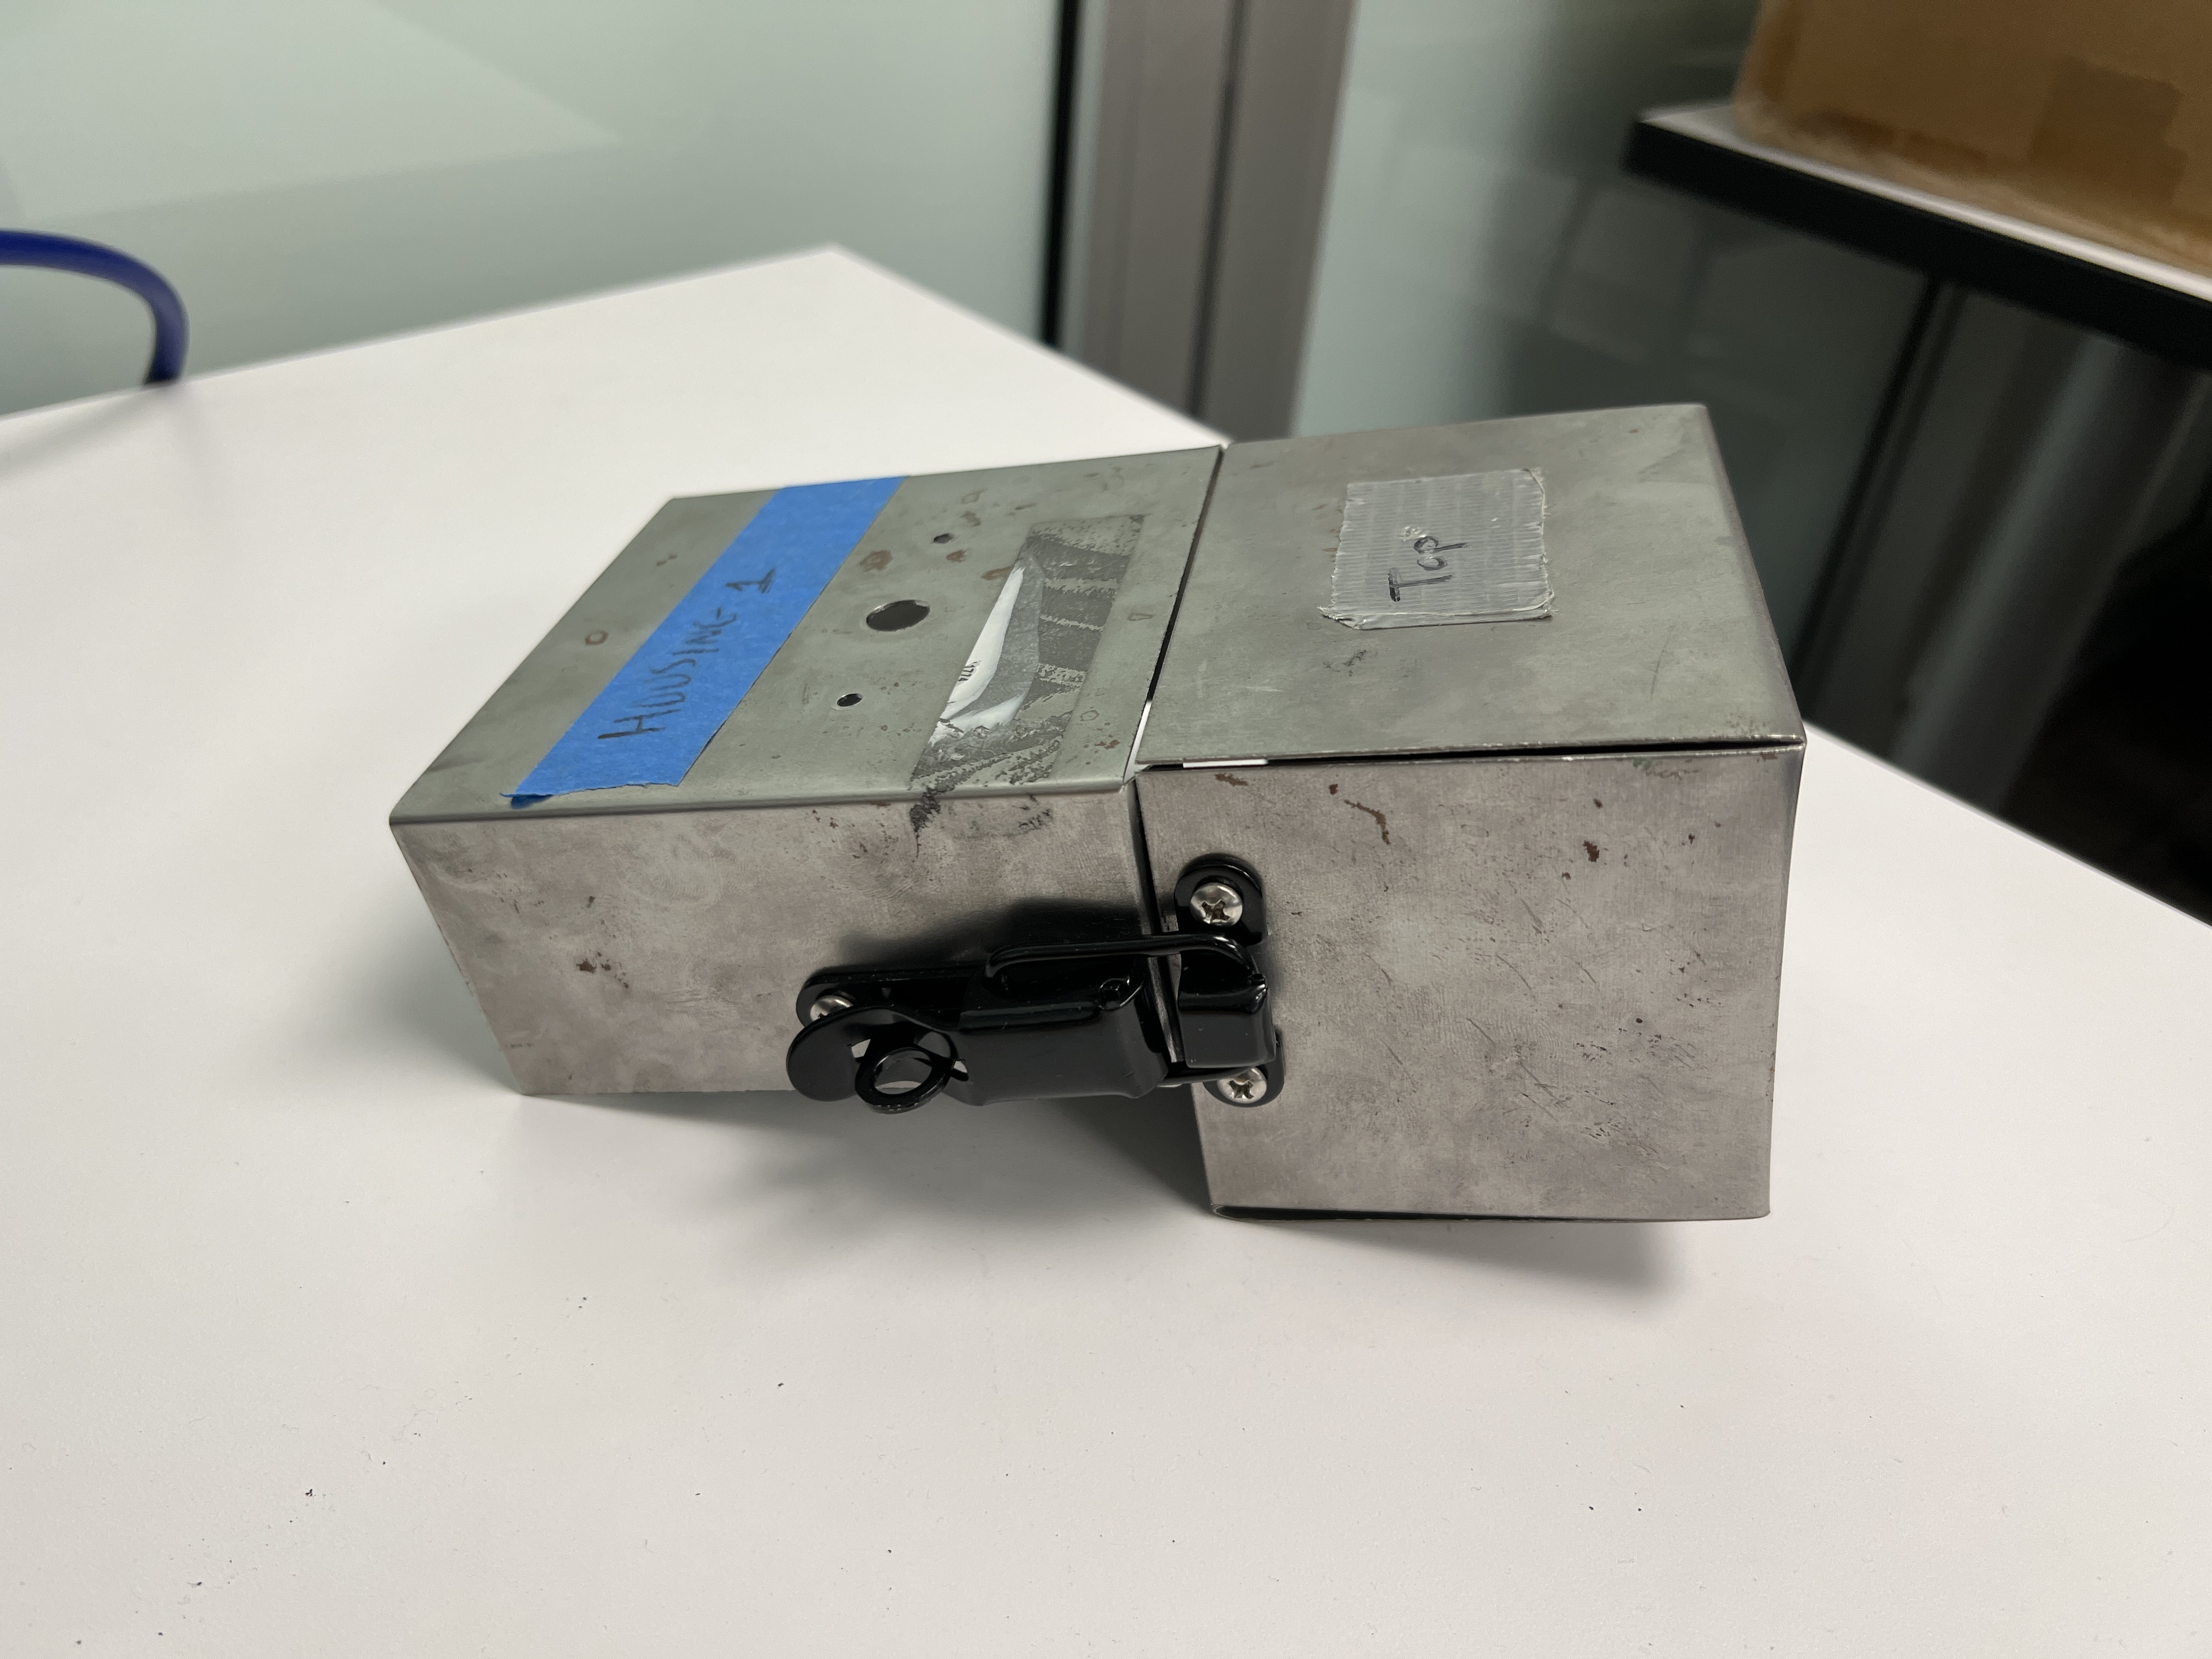
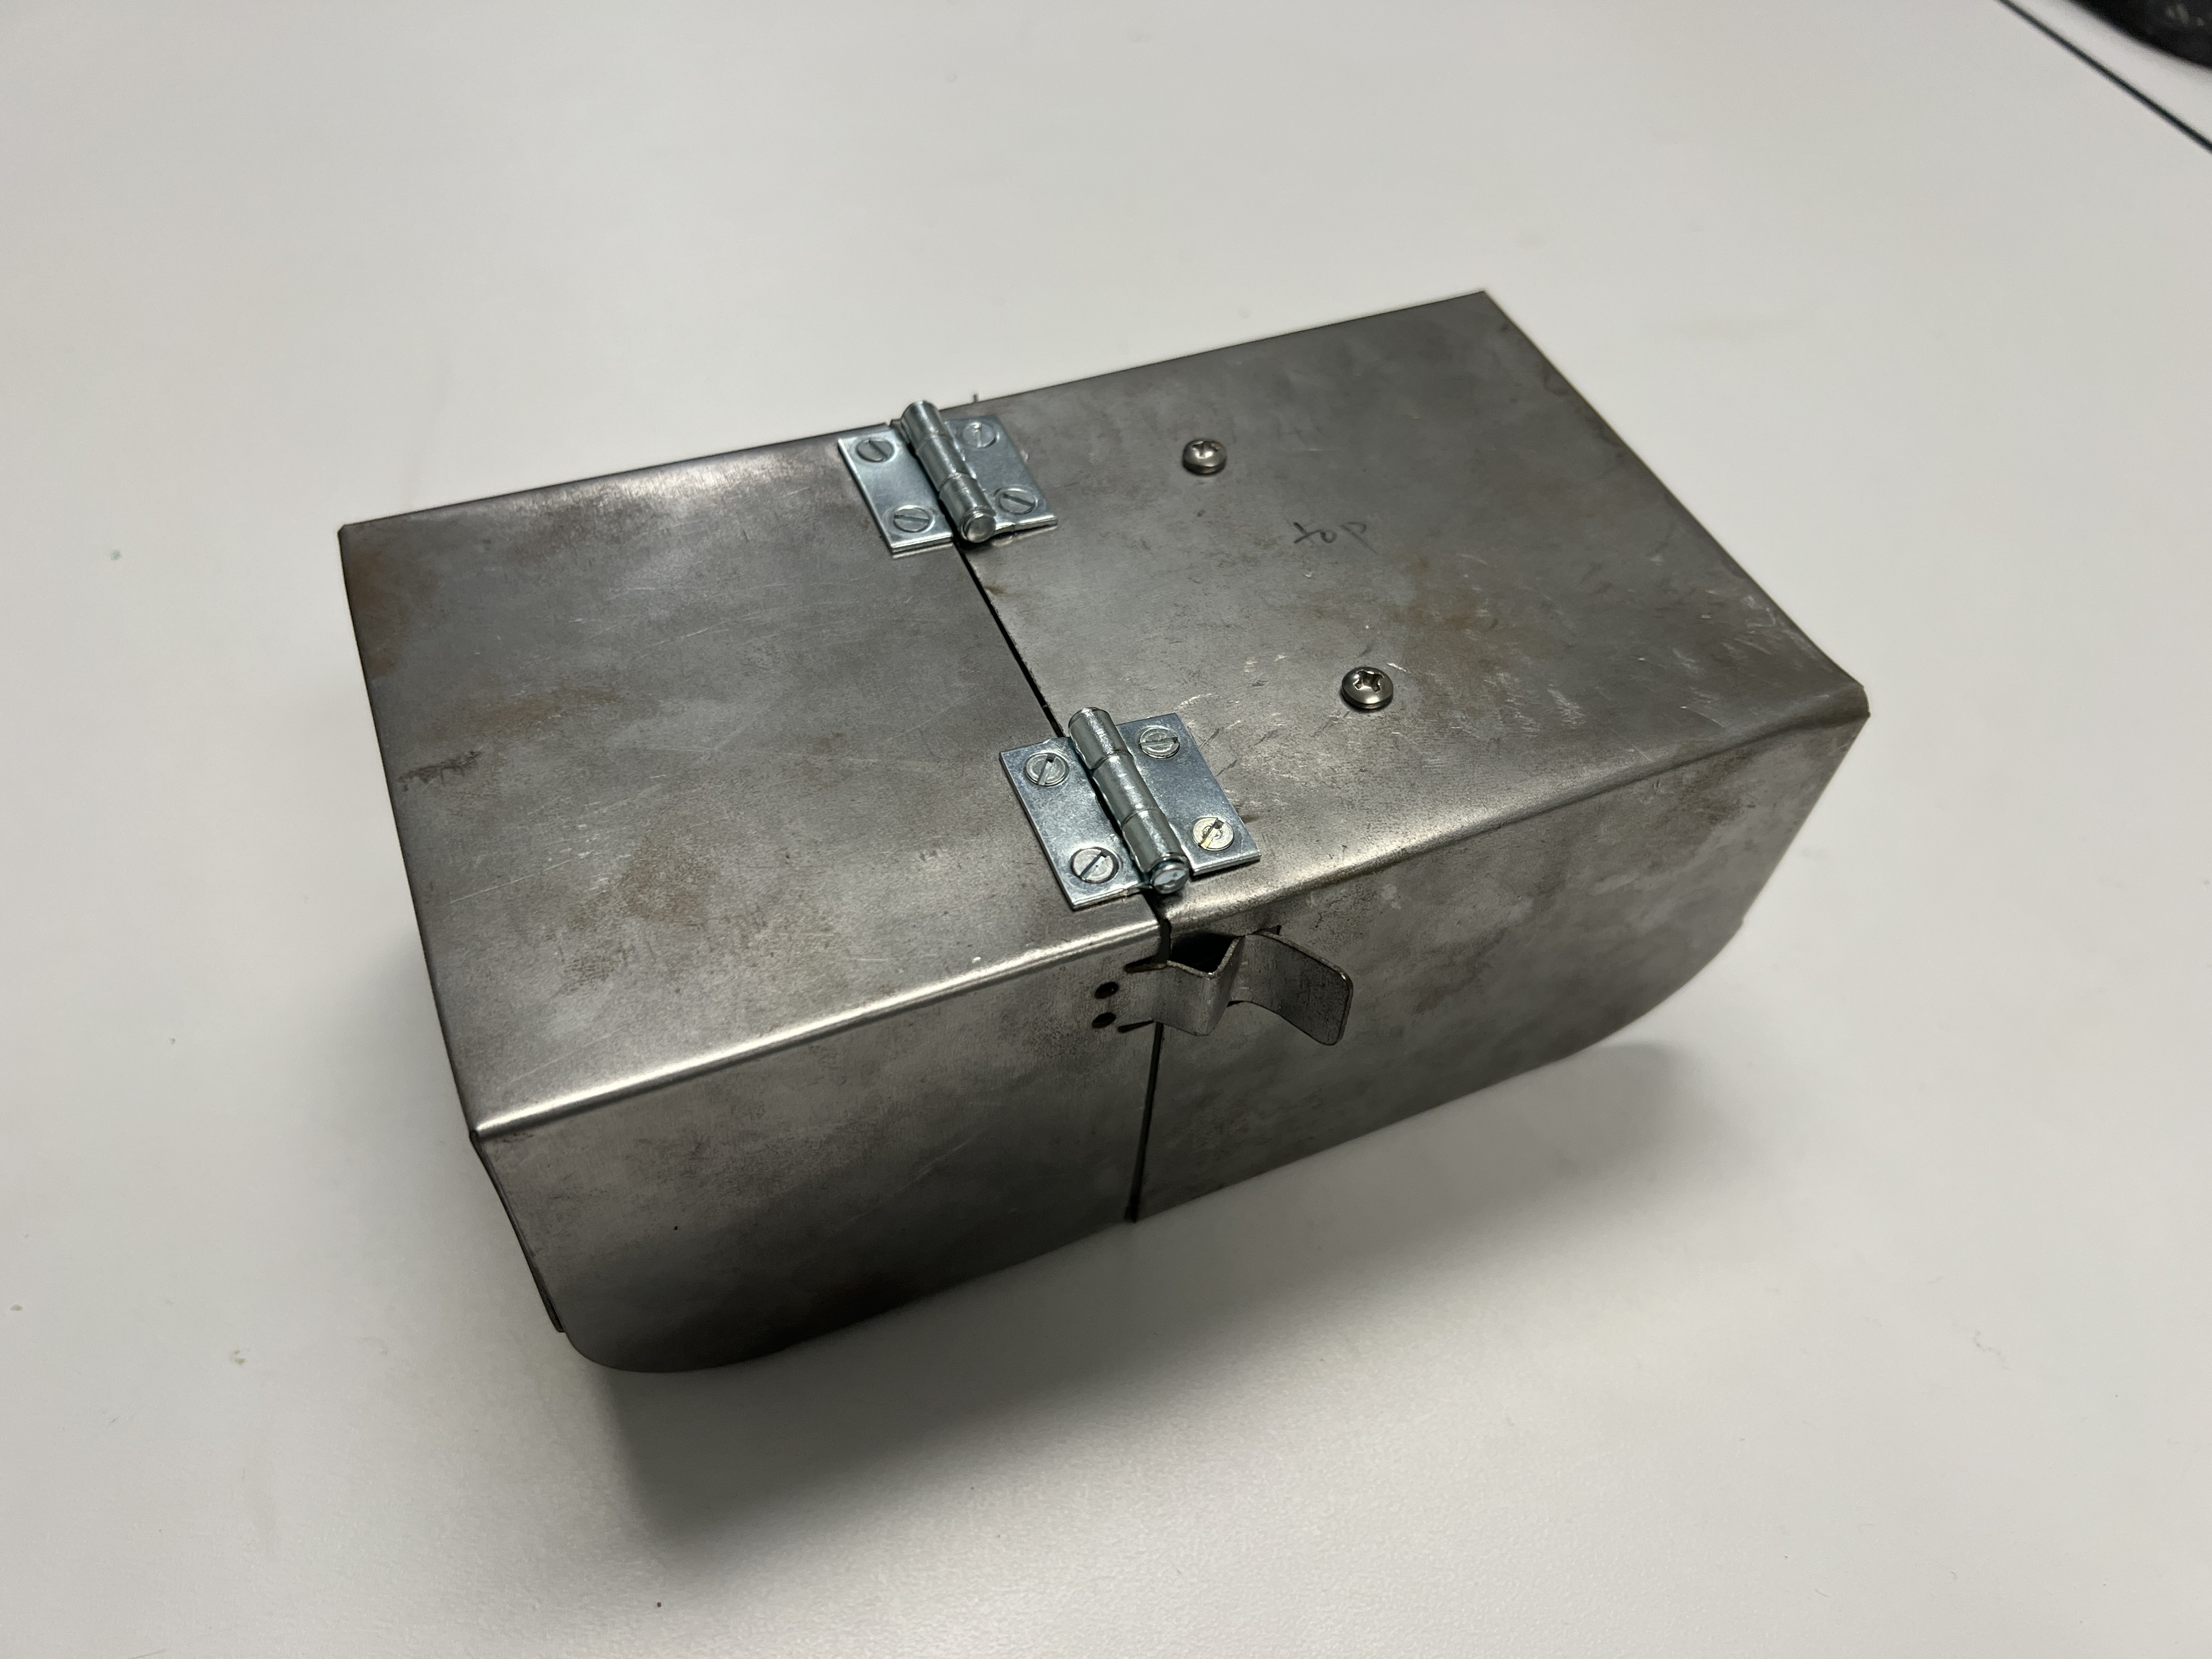
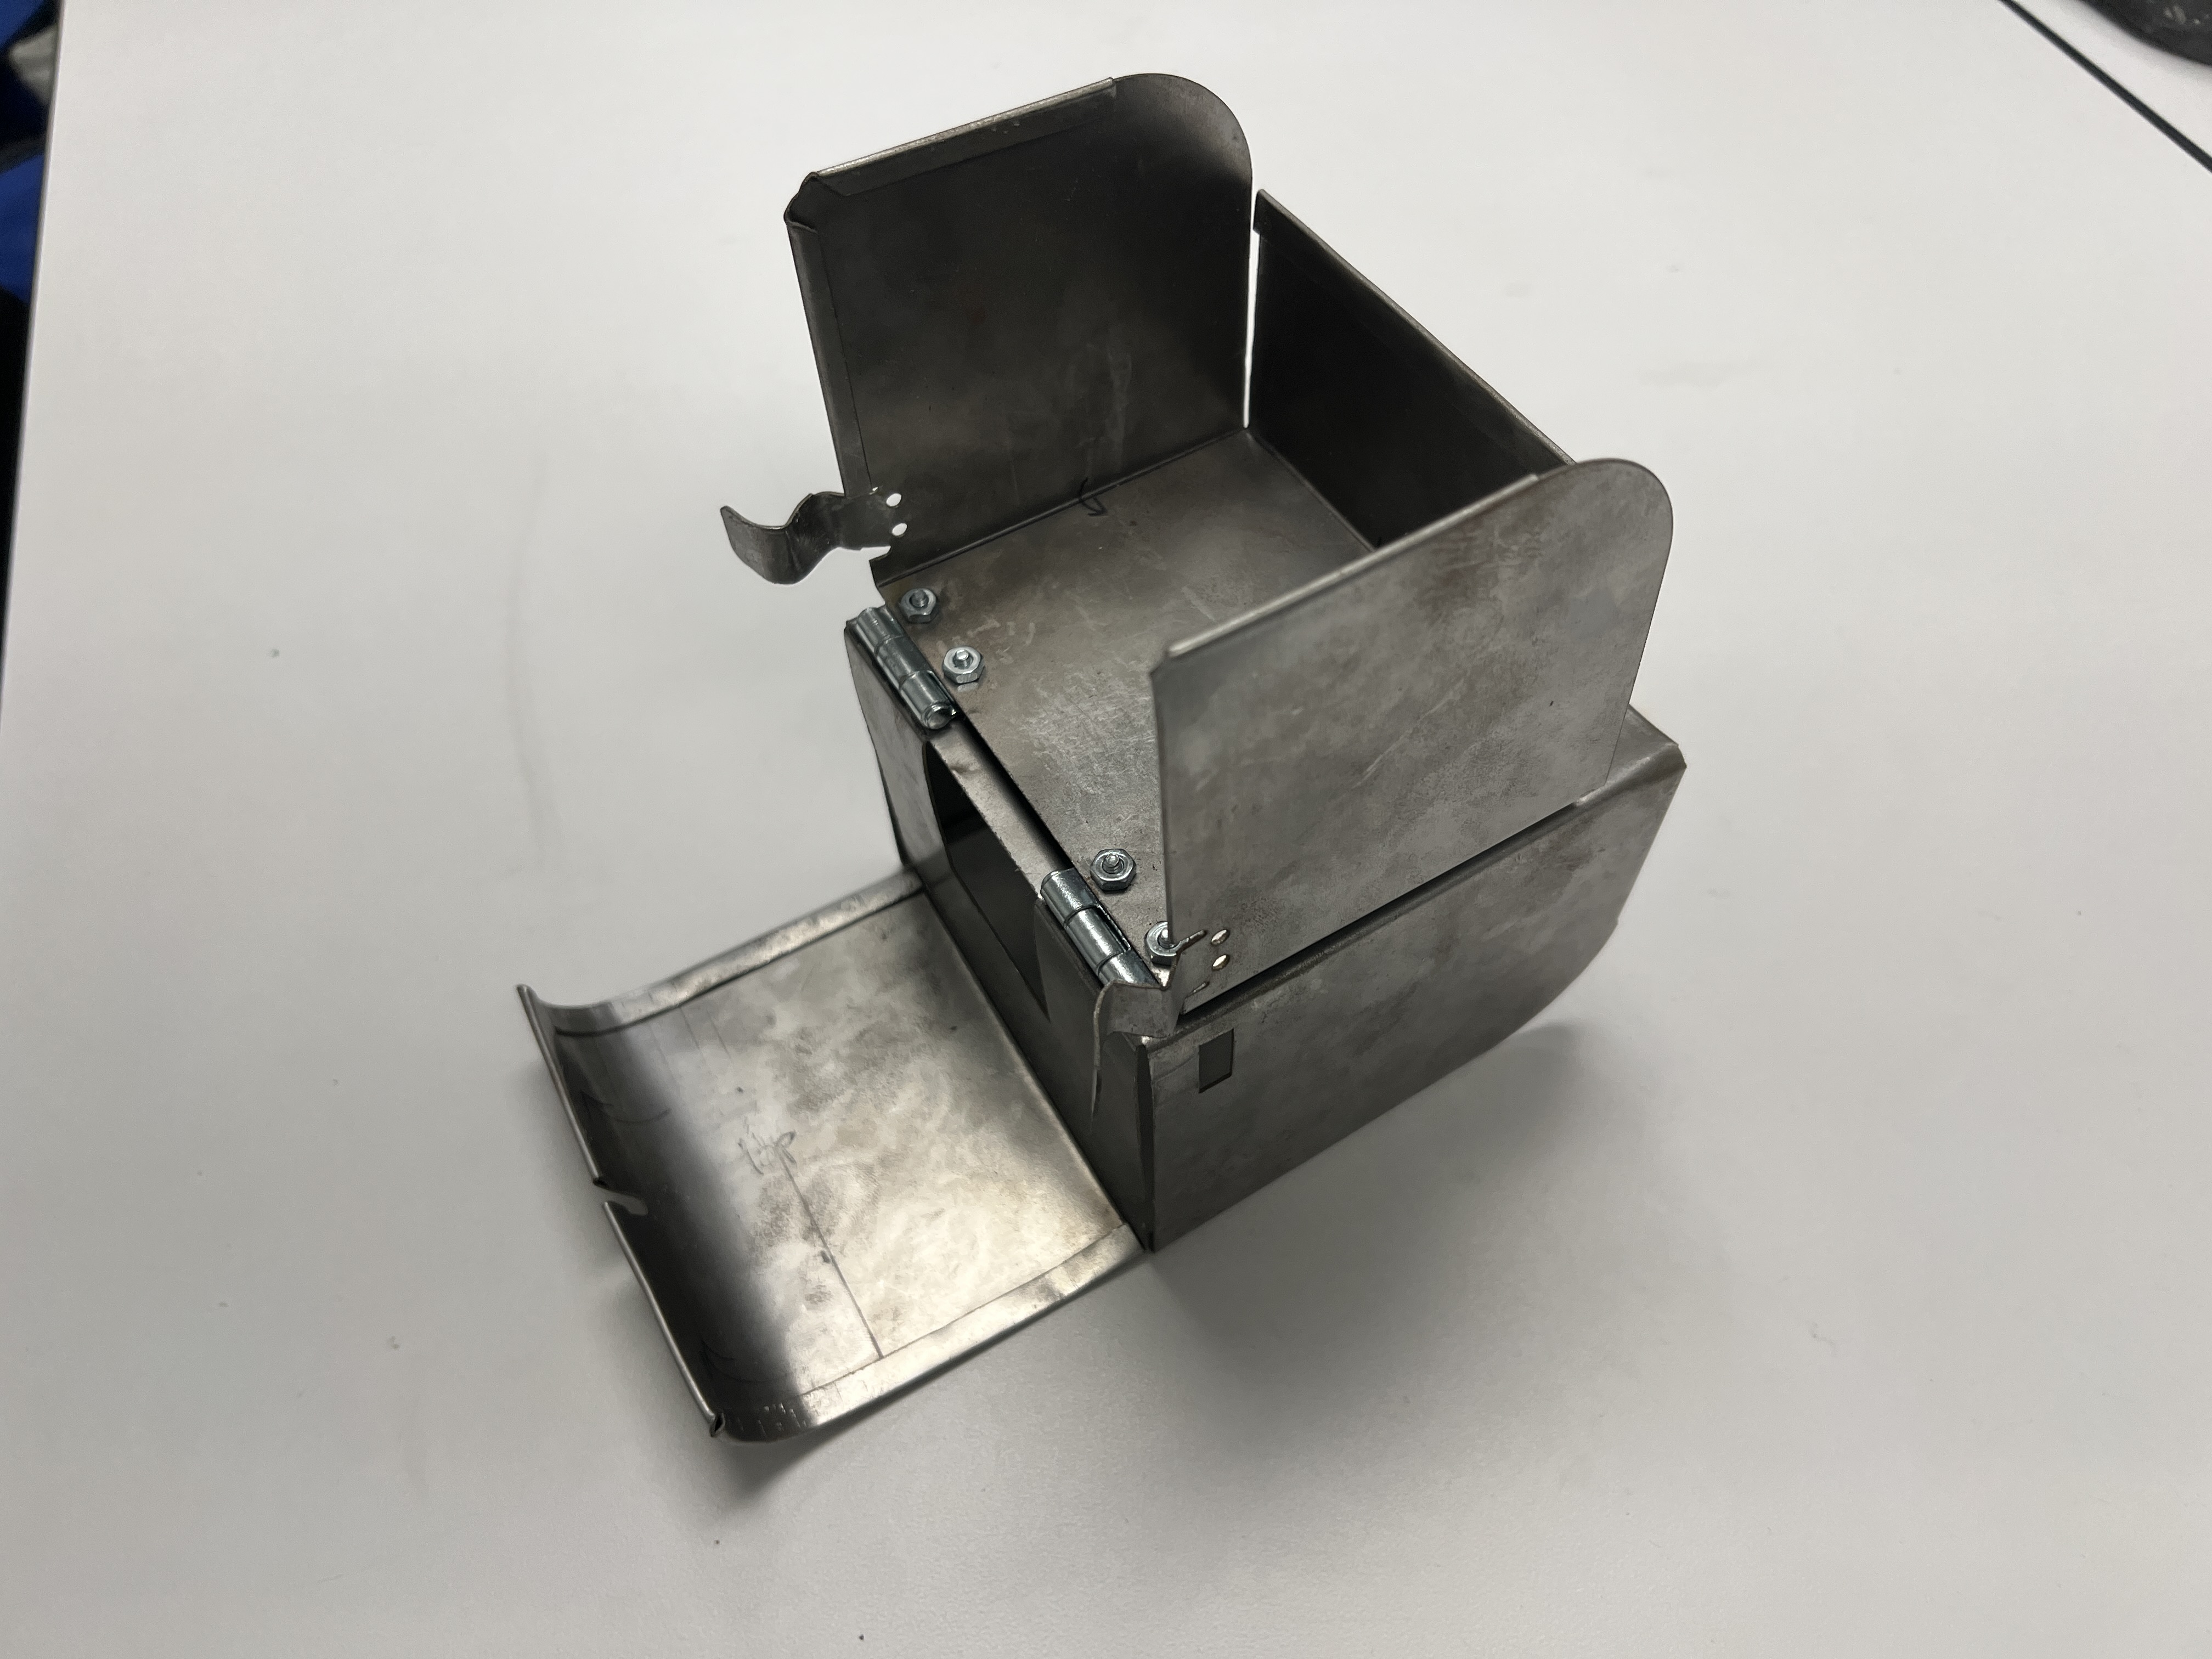
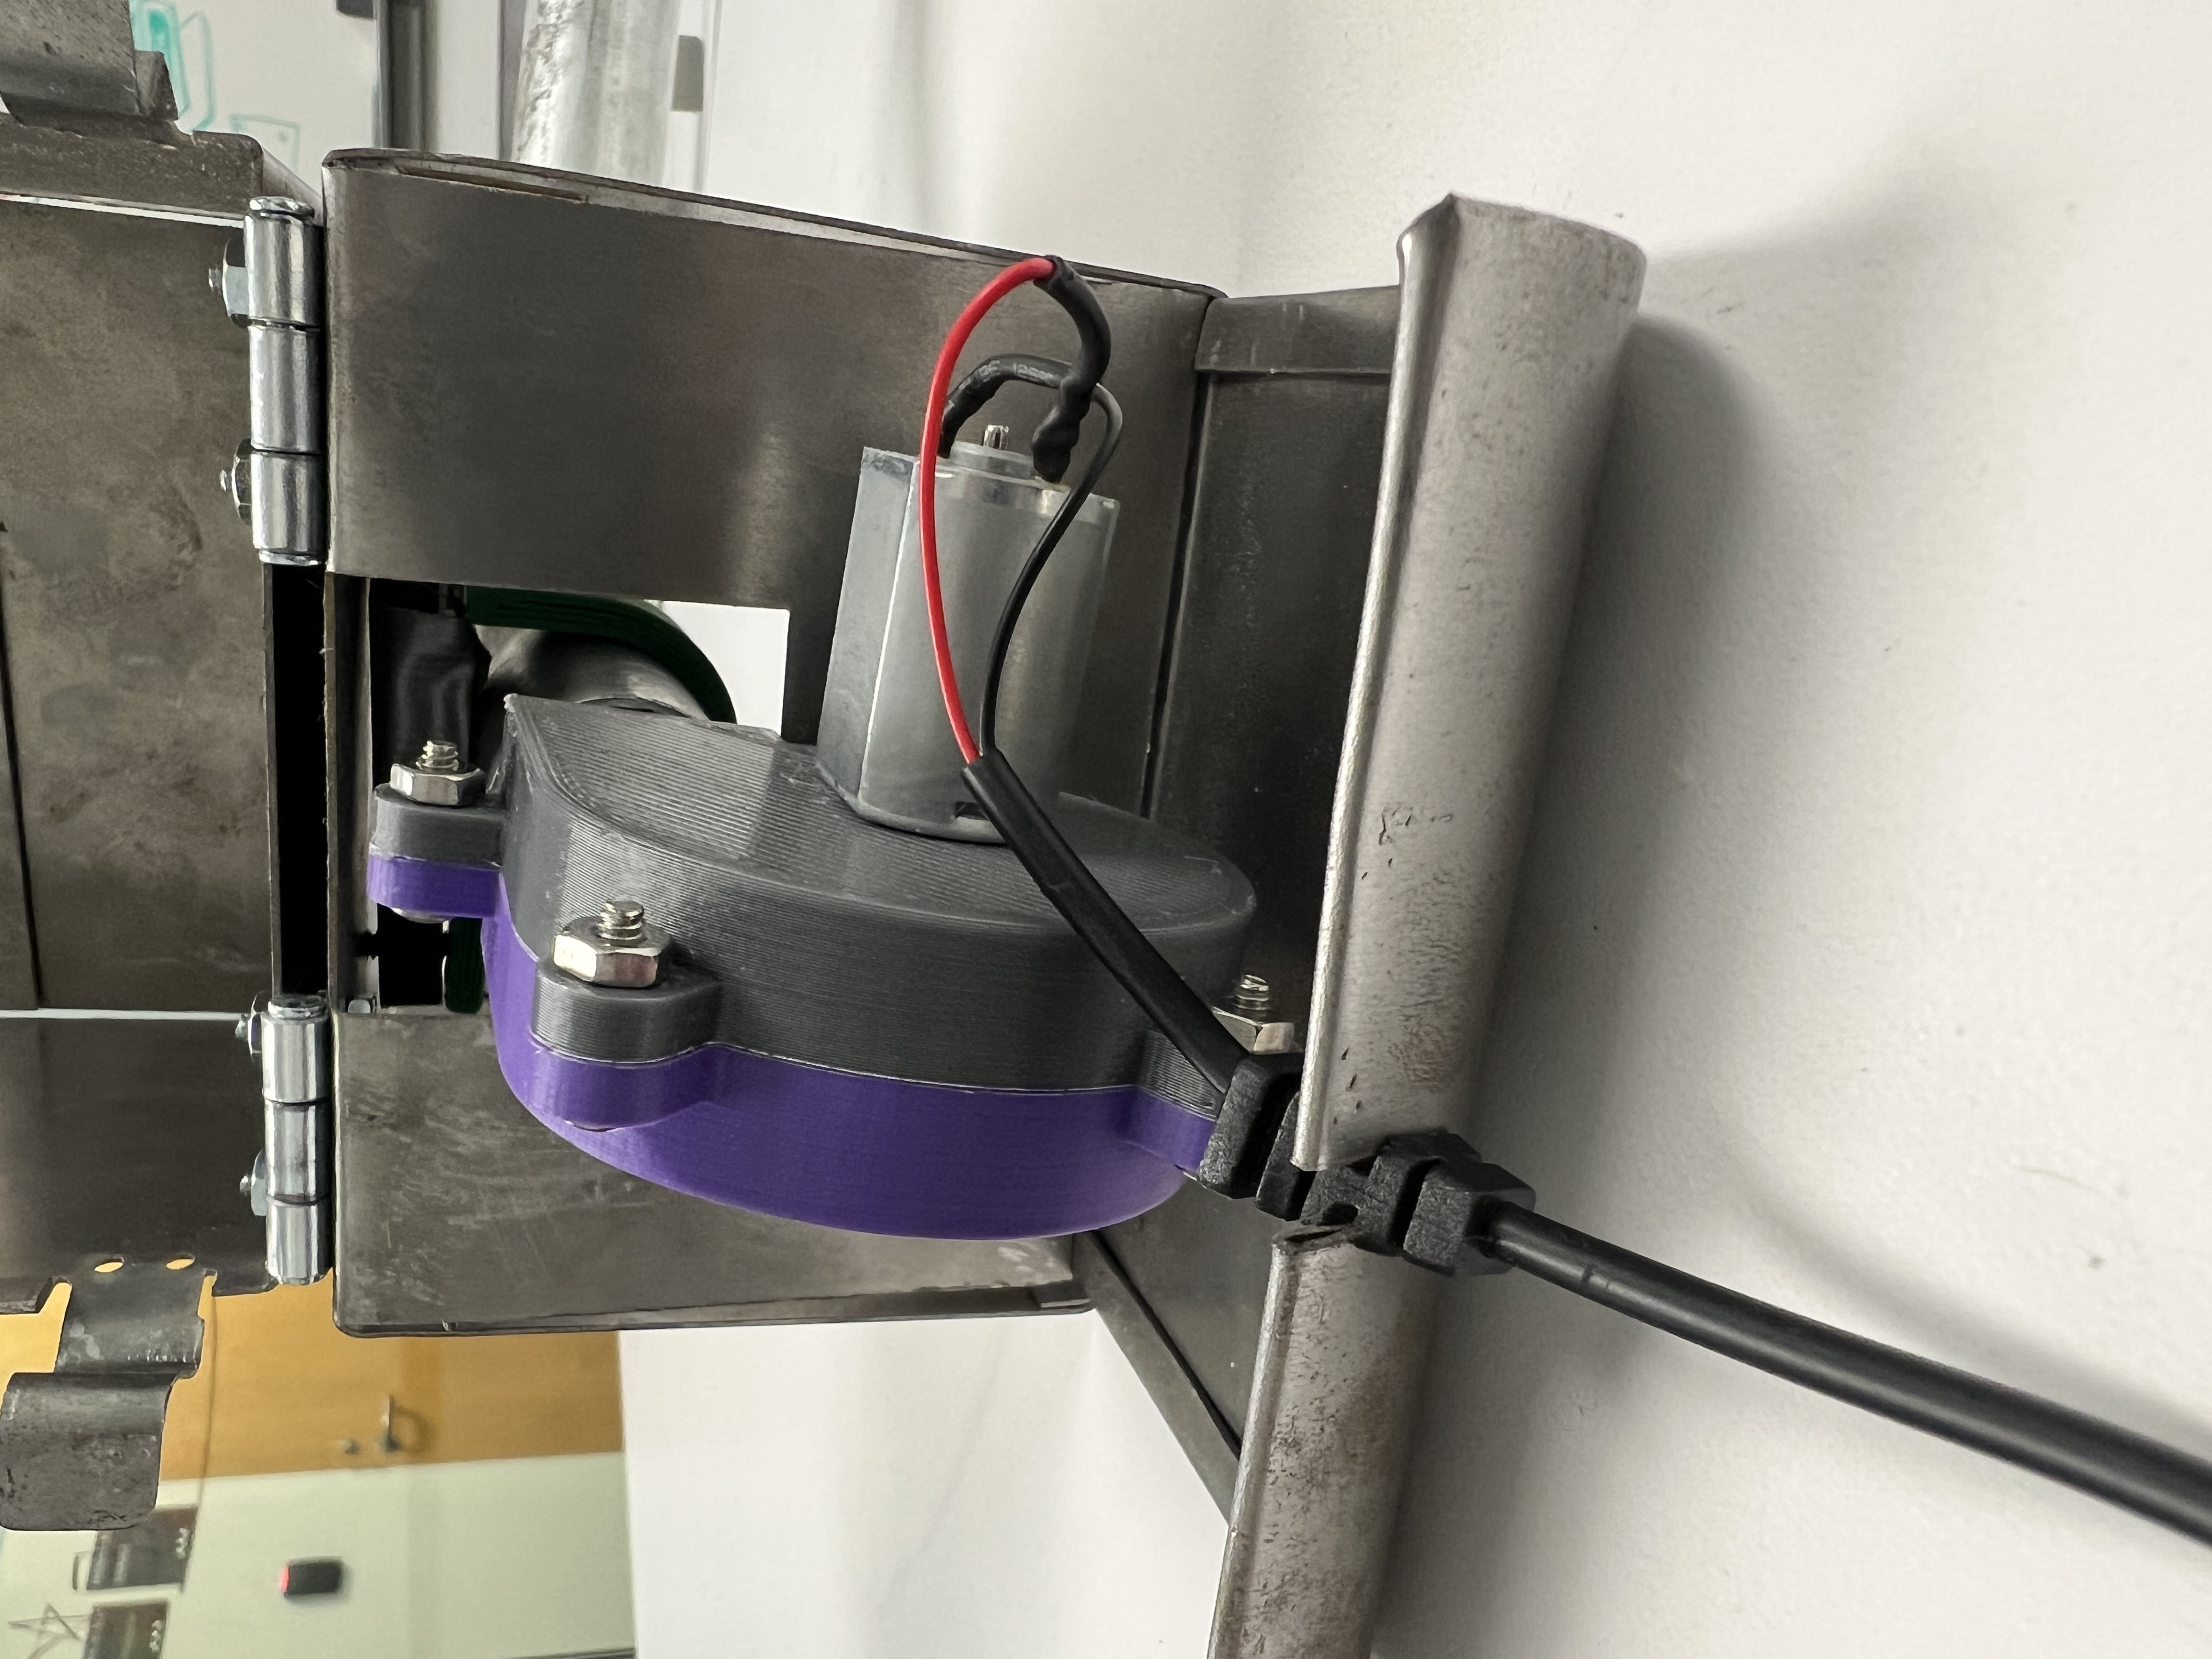
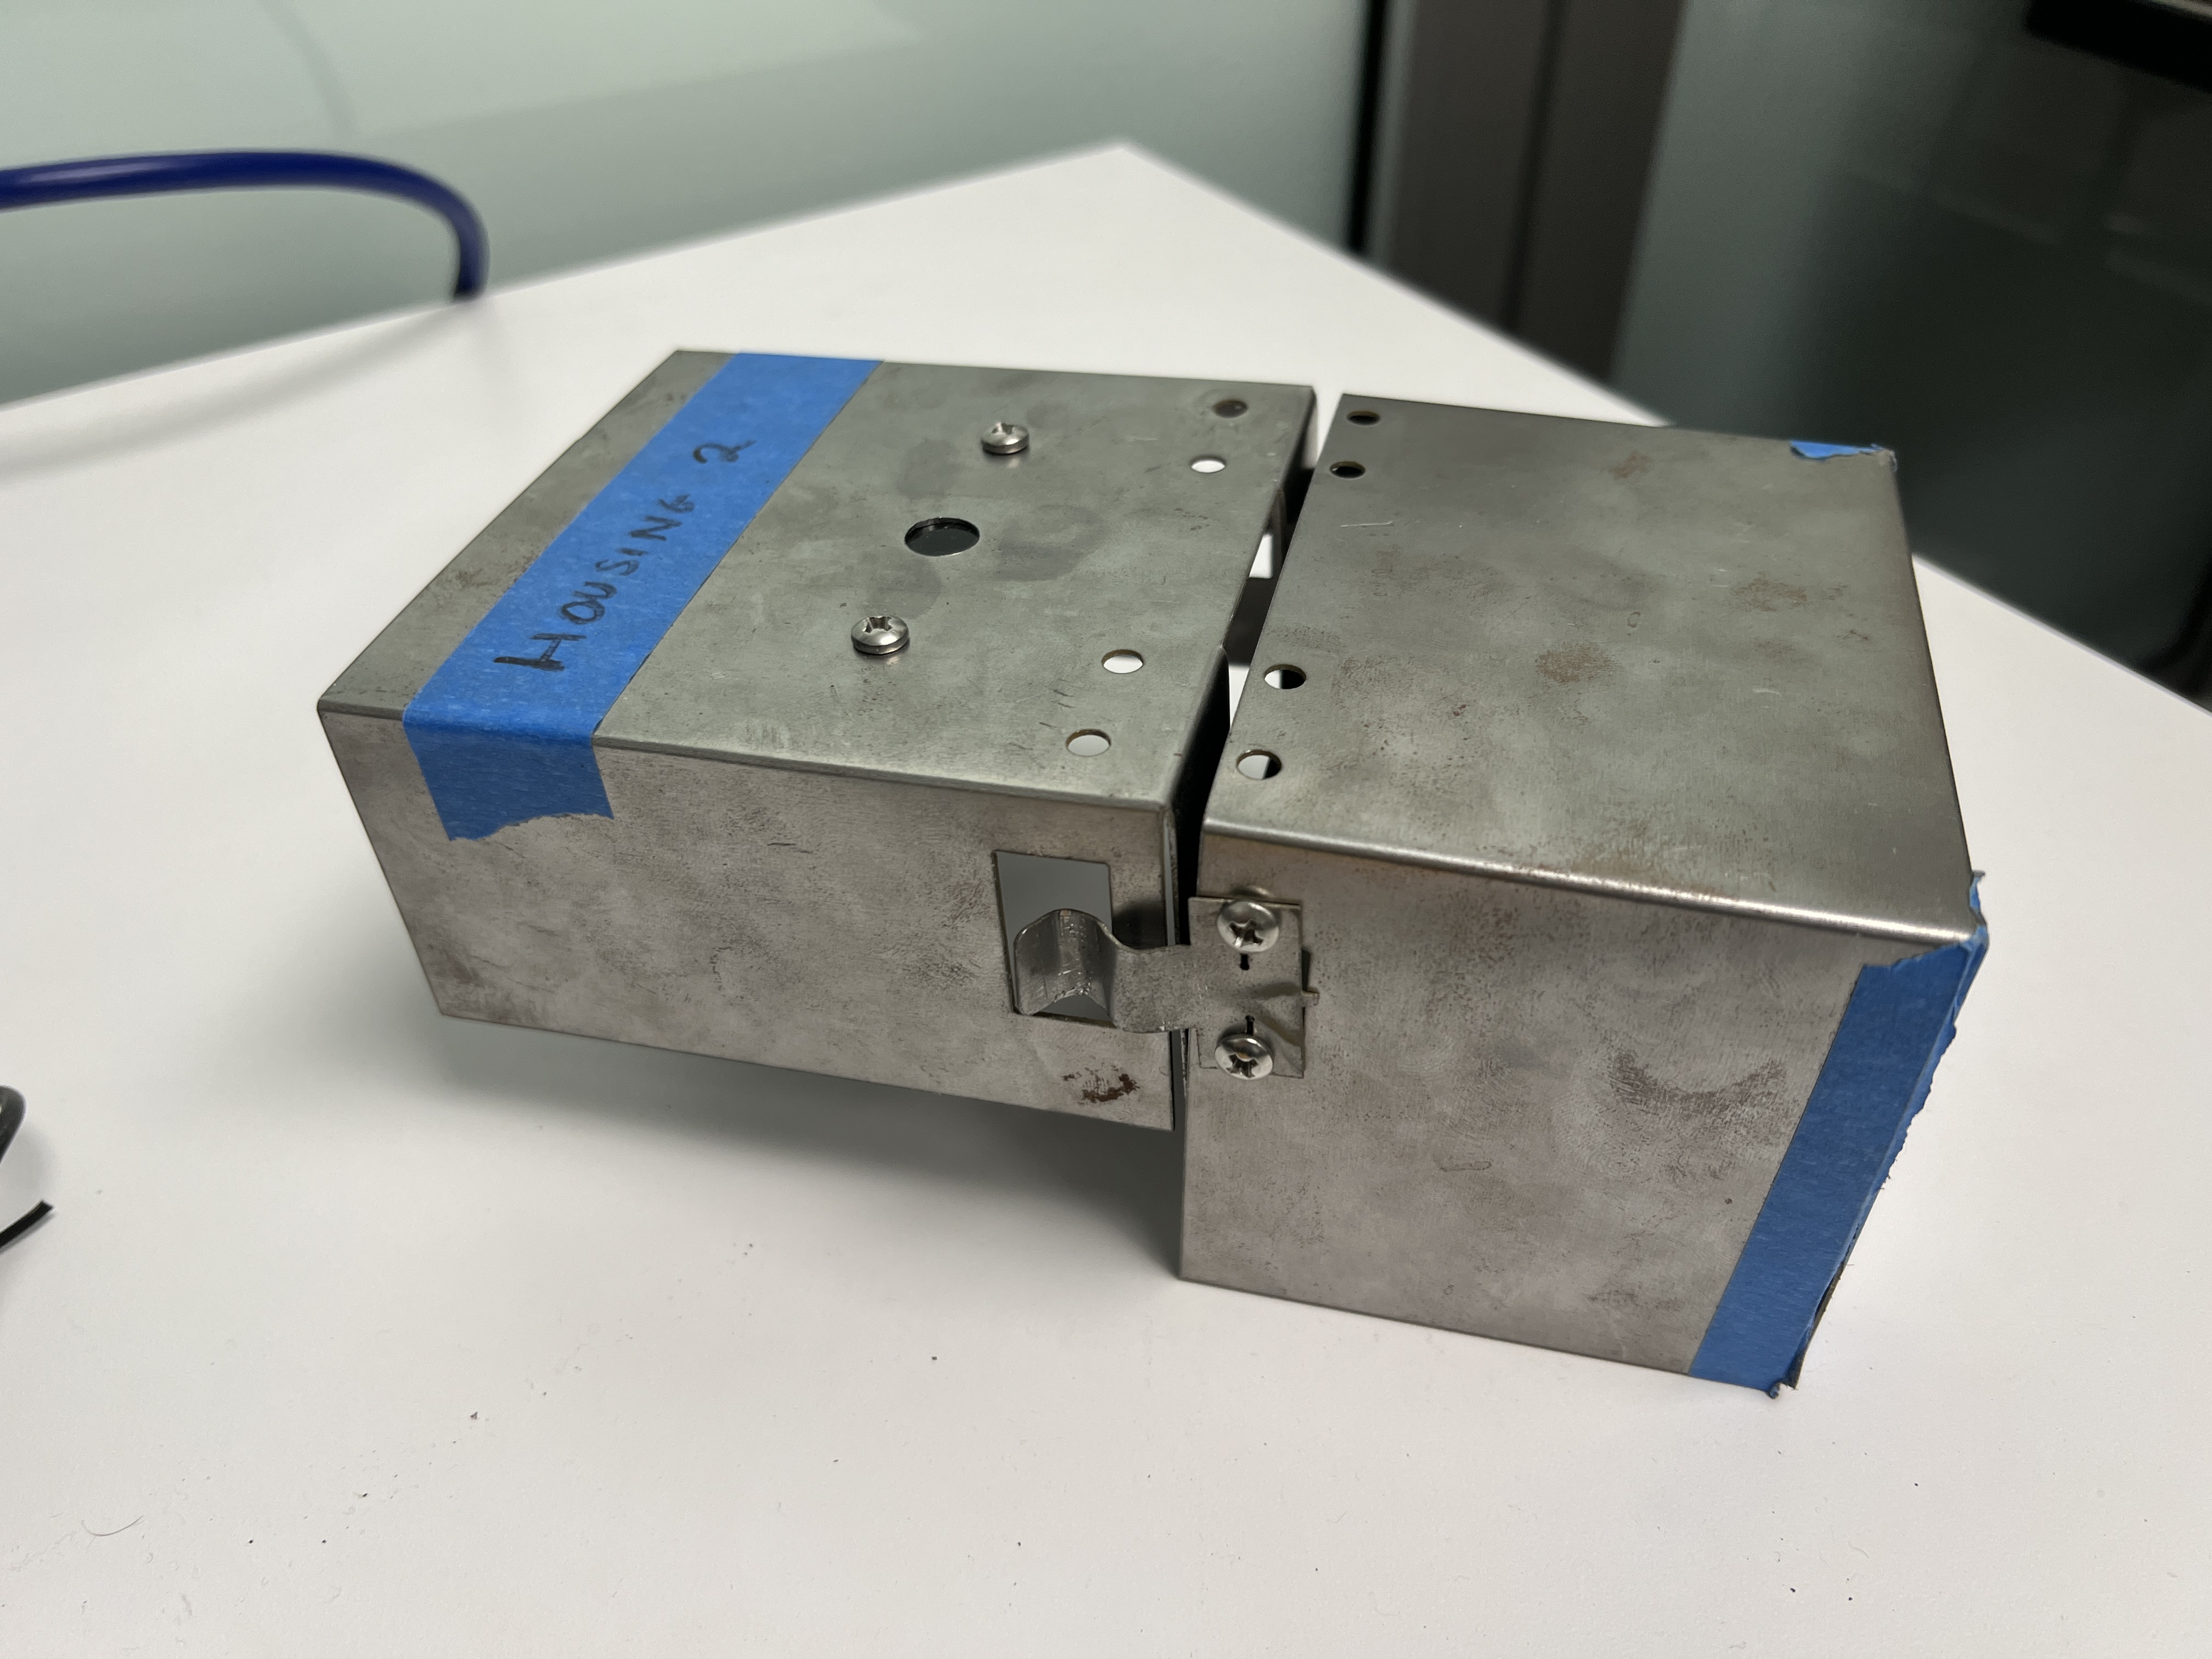
Aprovecho Clinic Project
Sep 2022-May 2023
For my senior year capstone project, I redesigned the fan housing system for Aprovecho Research Center's Jet-Flame, which blows air into wood fired cookstoves to improve efficiency and decrease harmful emissions. This new fan housing enabled our prototype to have a 90 degree bend in the tubing to protect the meltable plastic fan casing from the fire. The bent sheet metal fan housing has a part that flips up and clips in place to allow easy access to the fan for repairs or replacement.
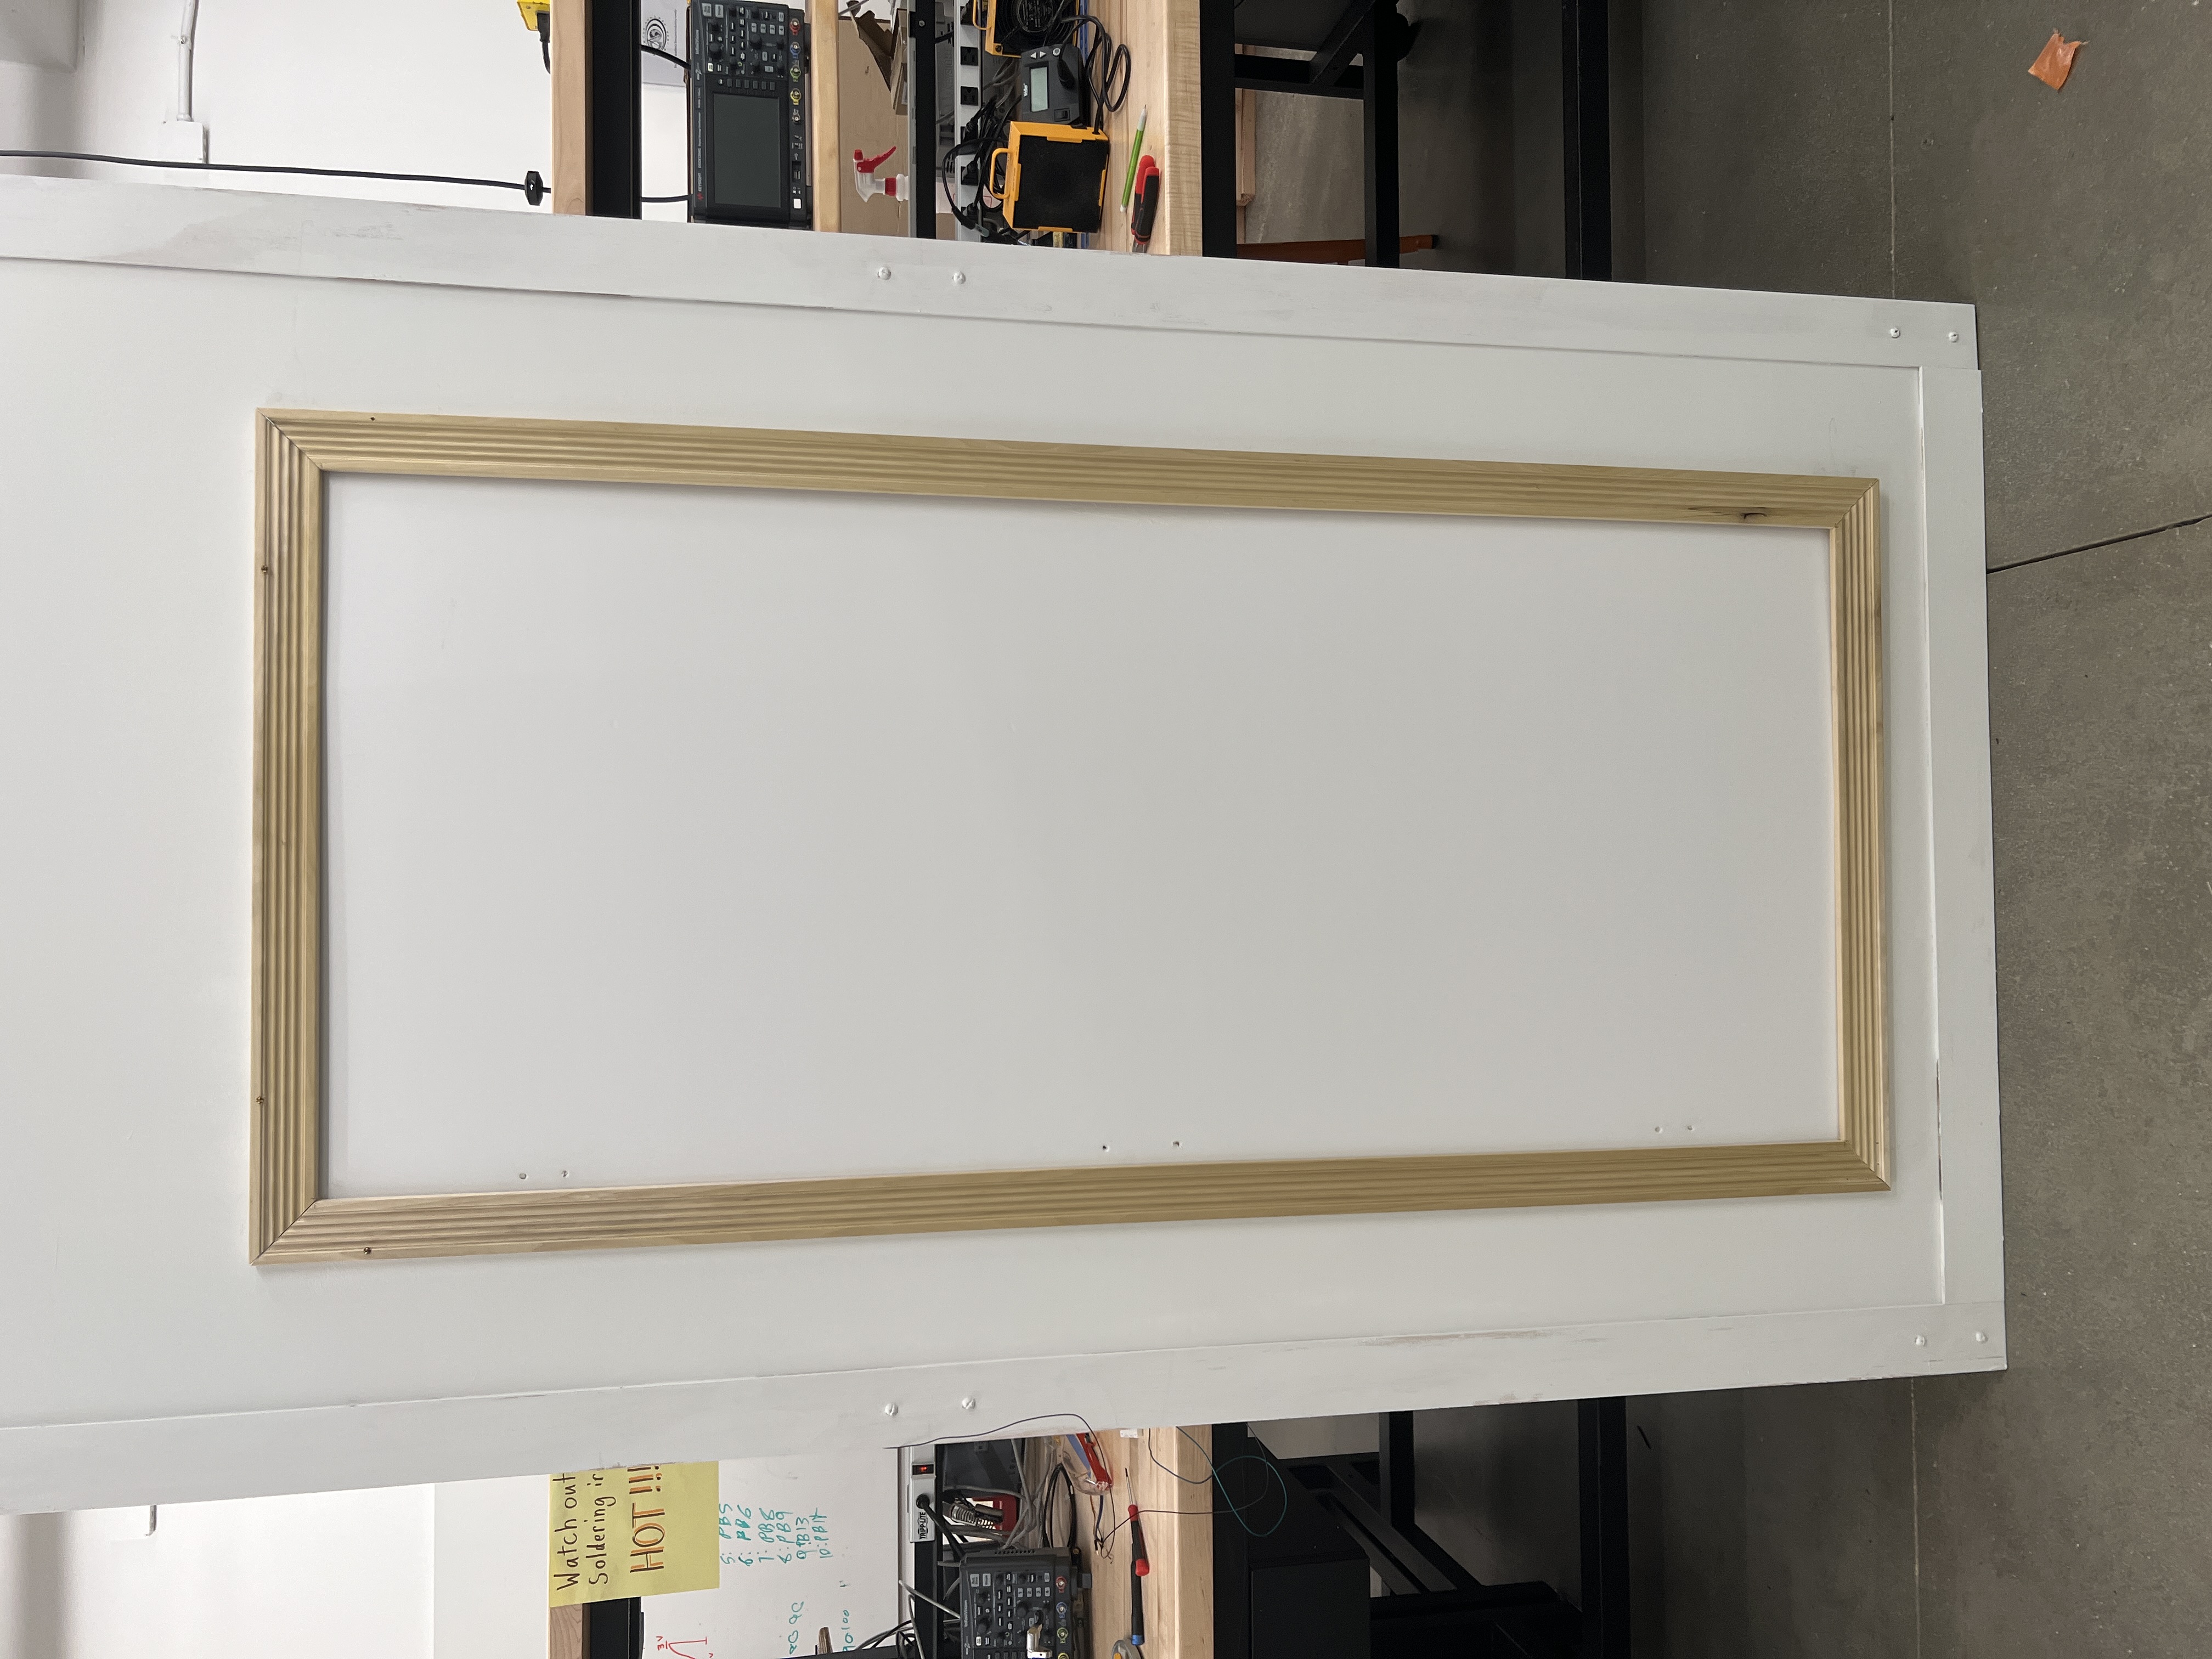
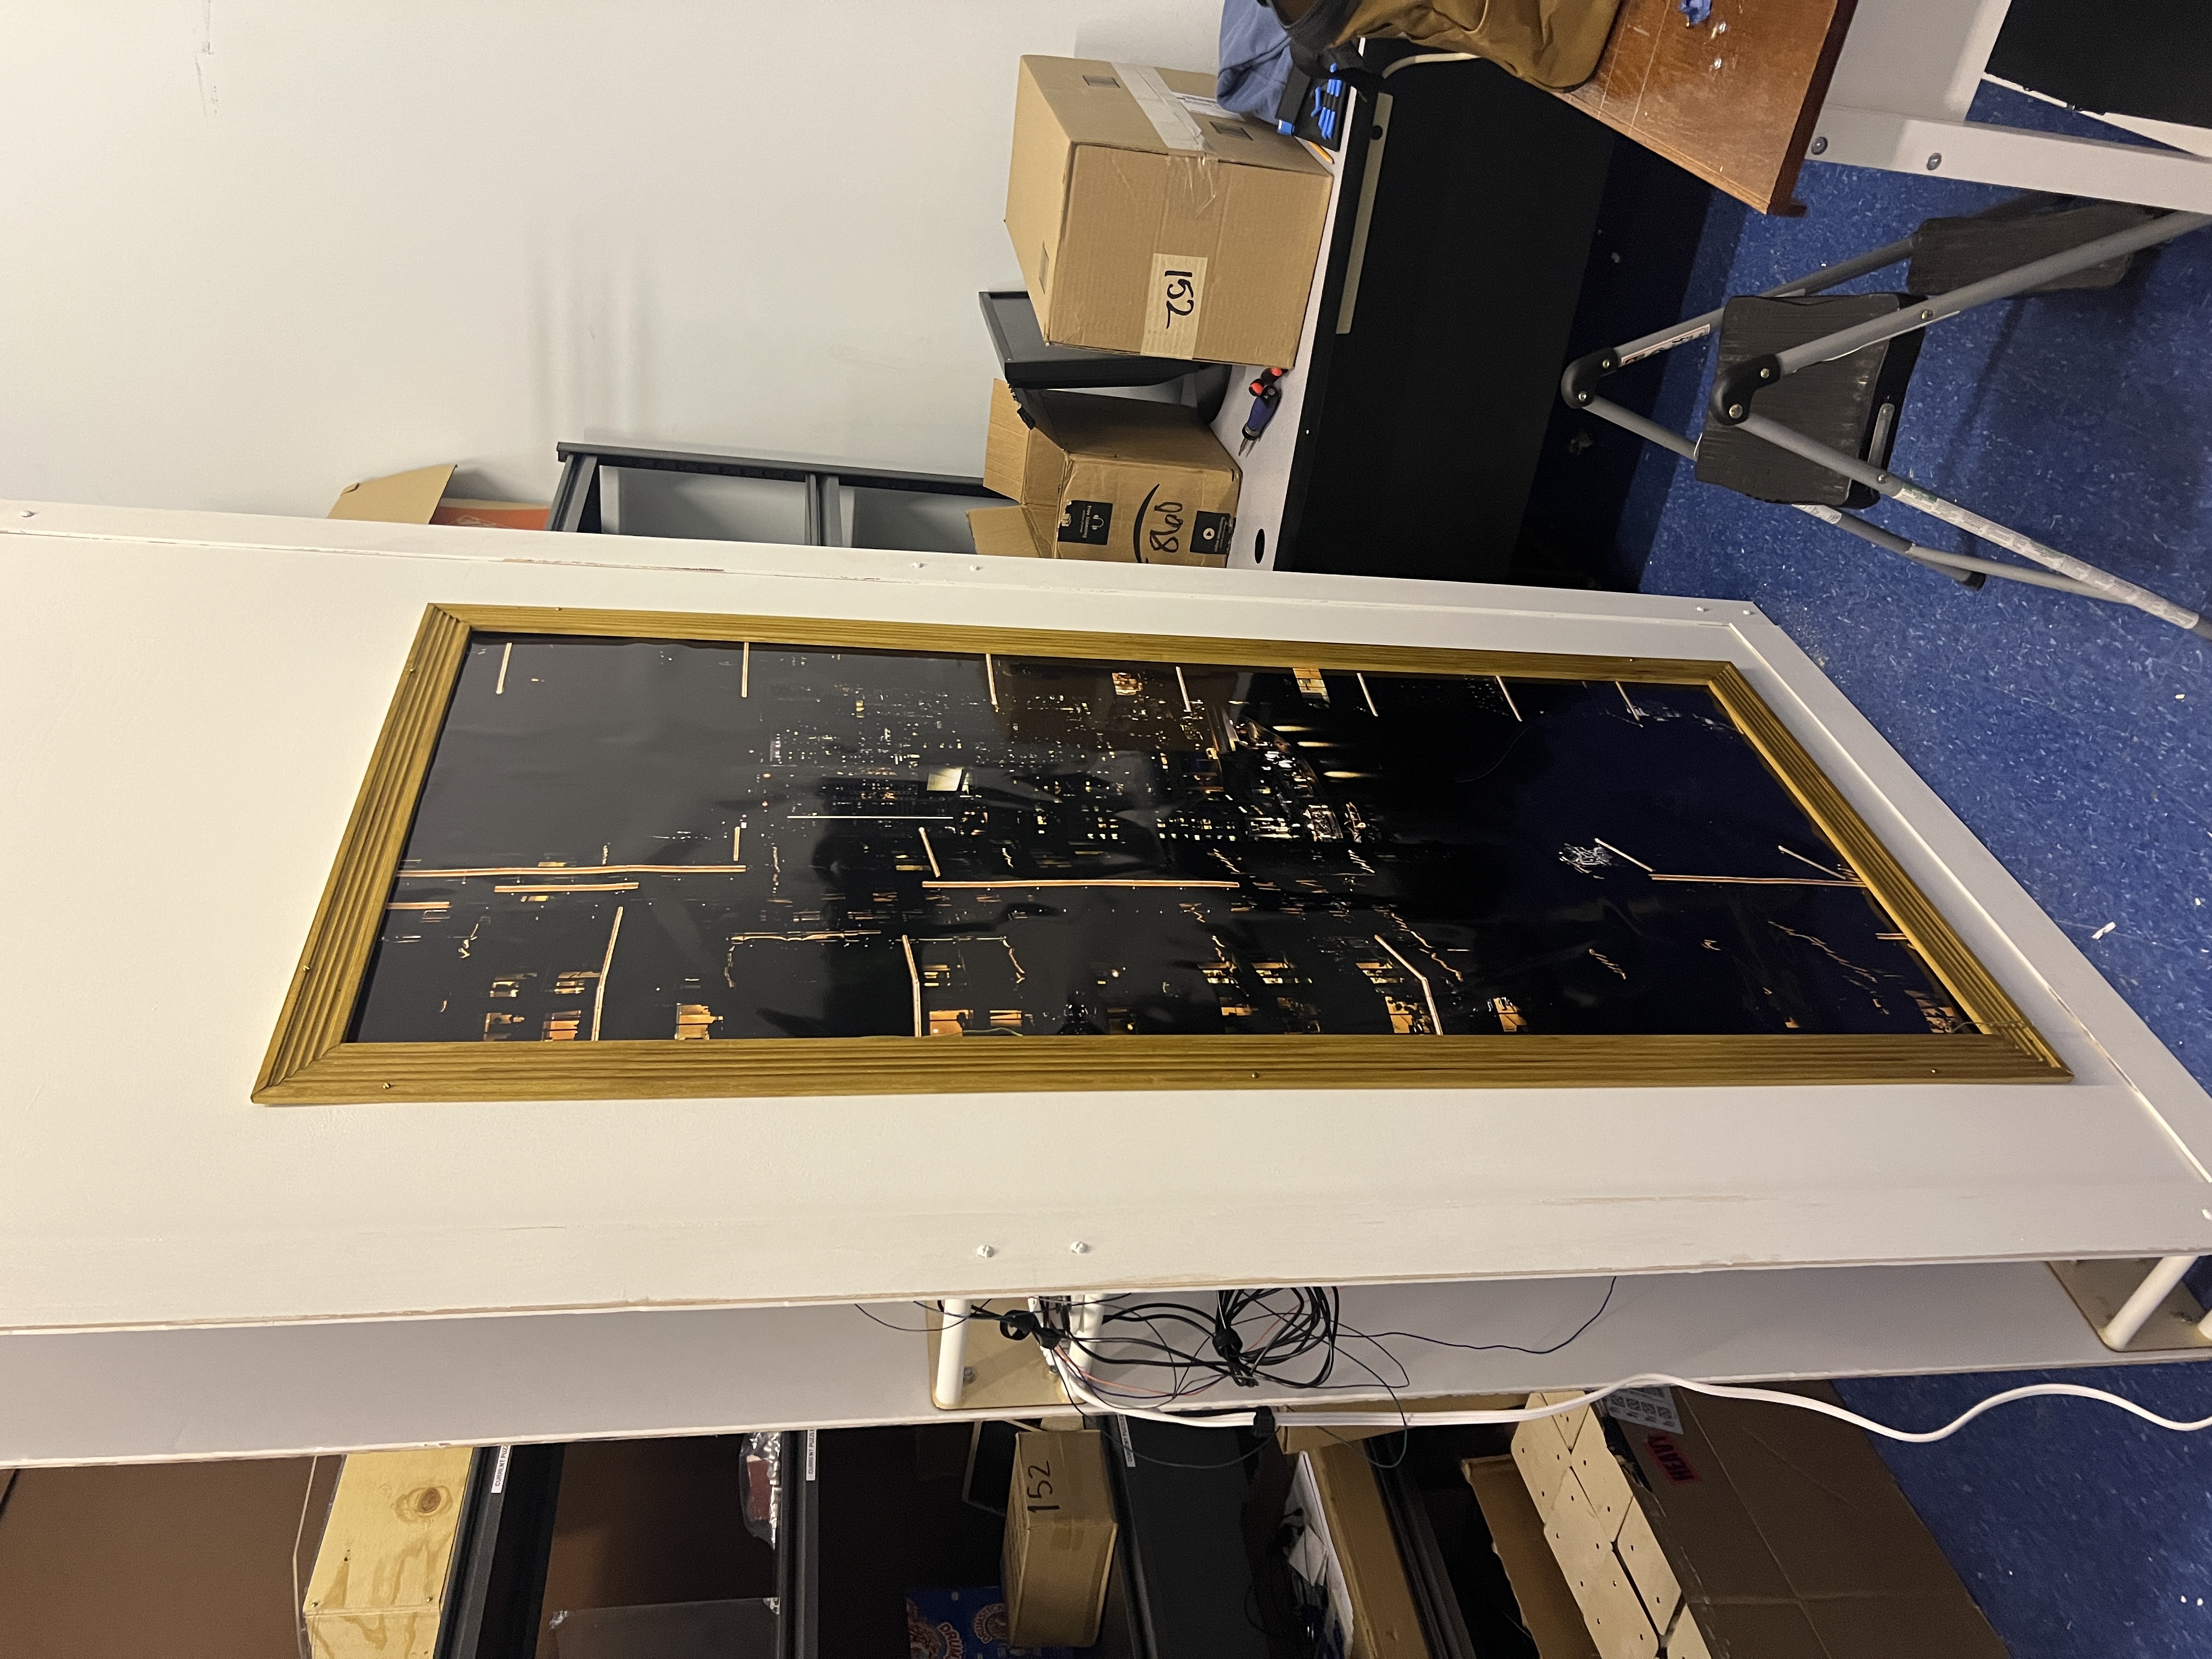
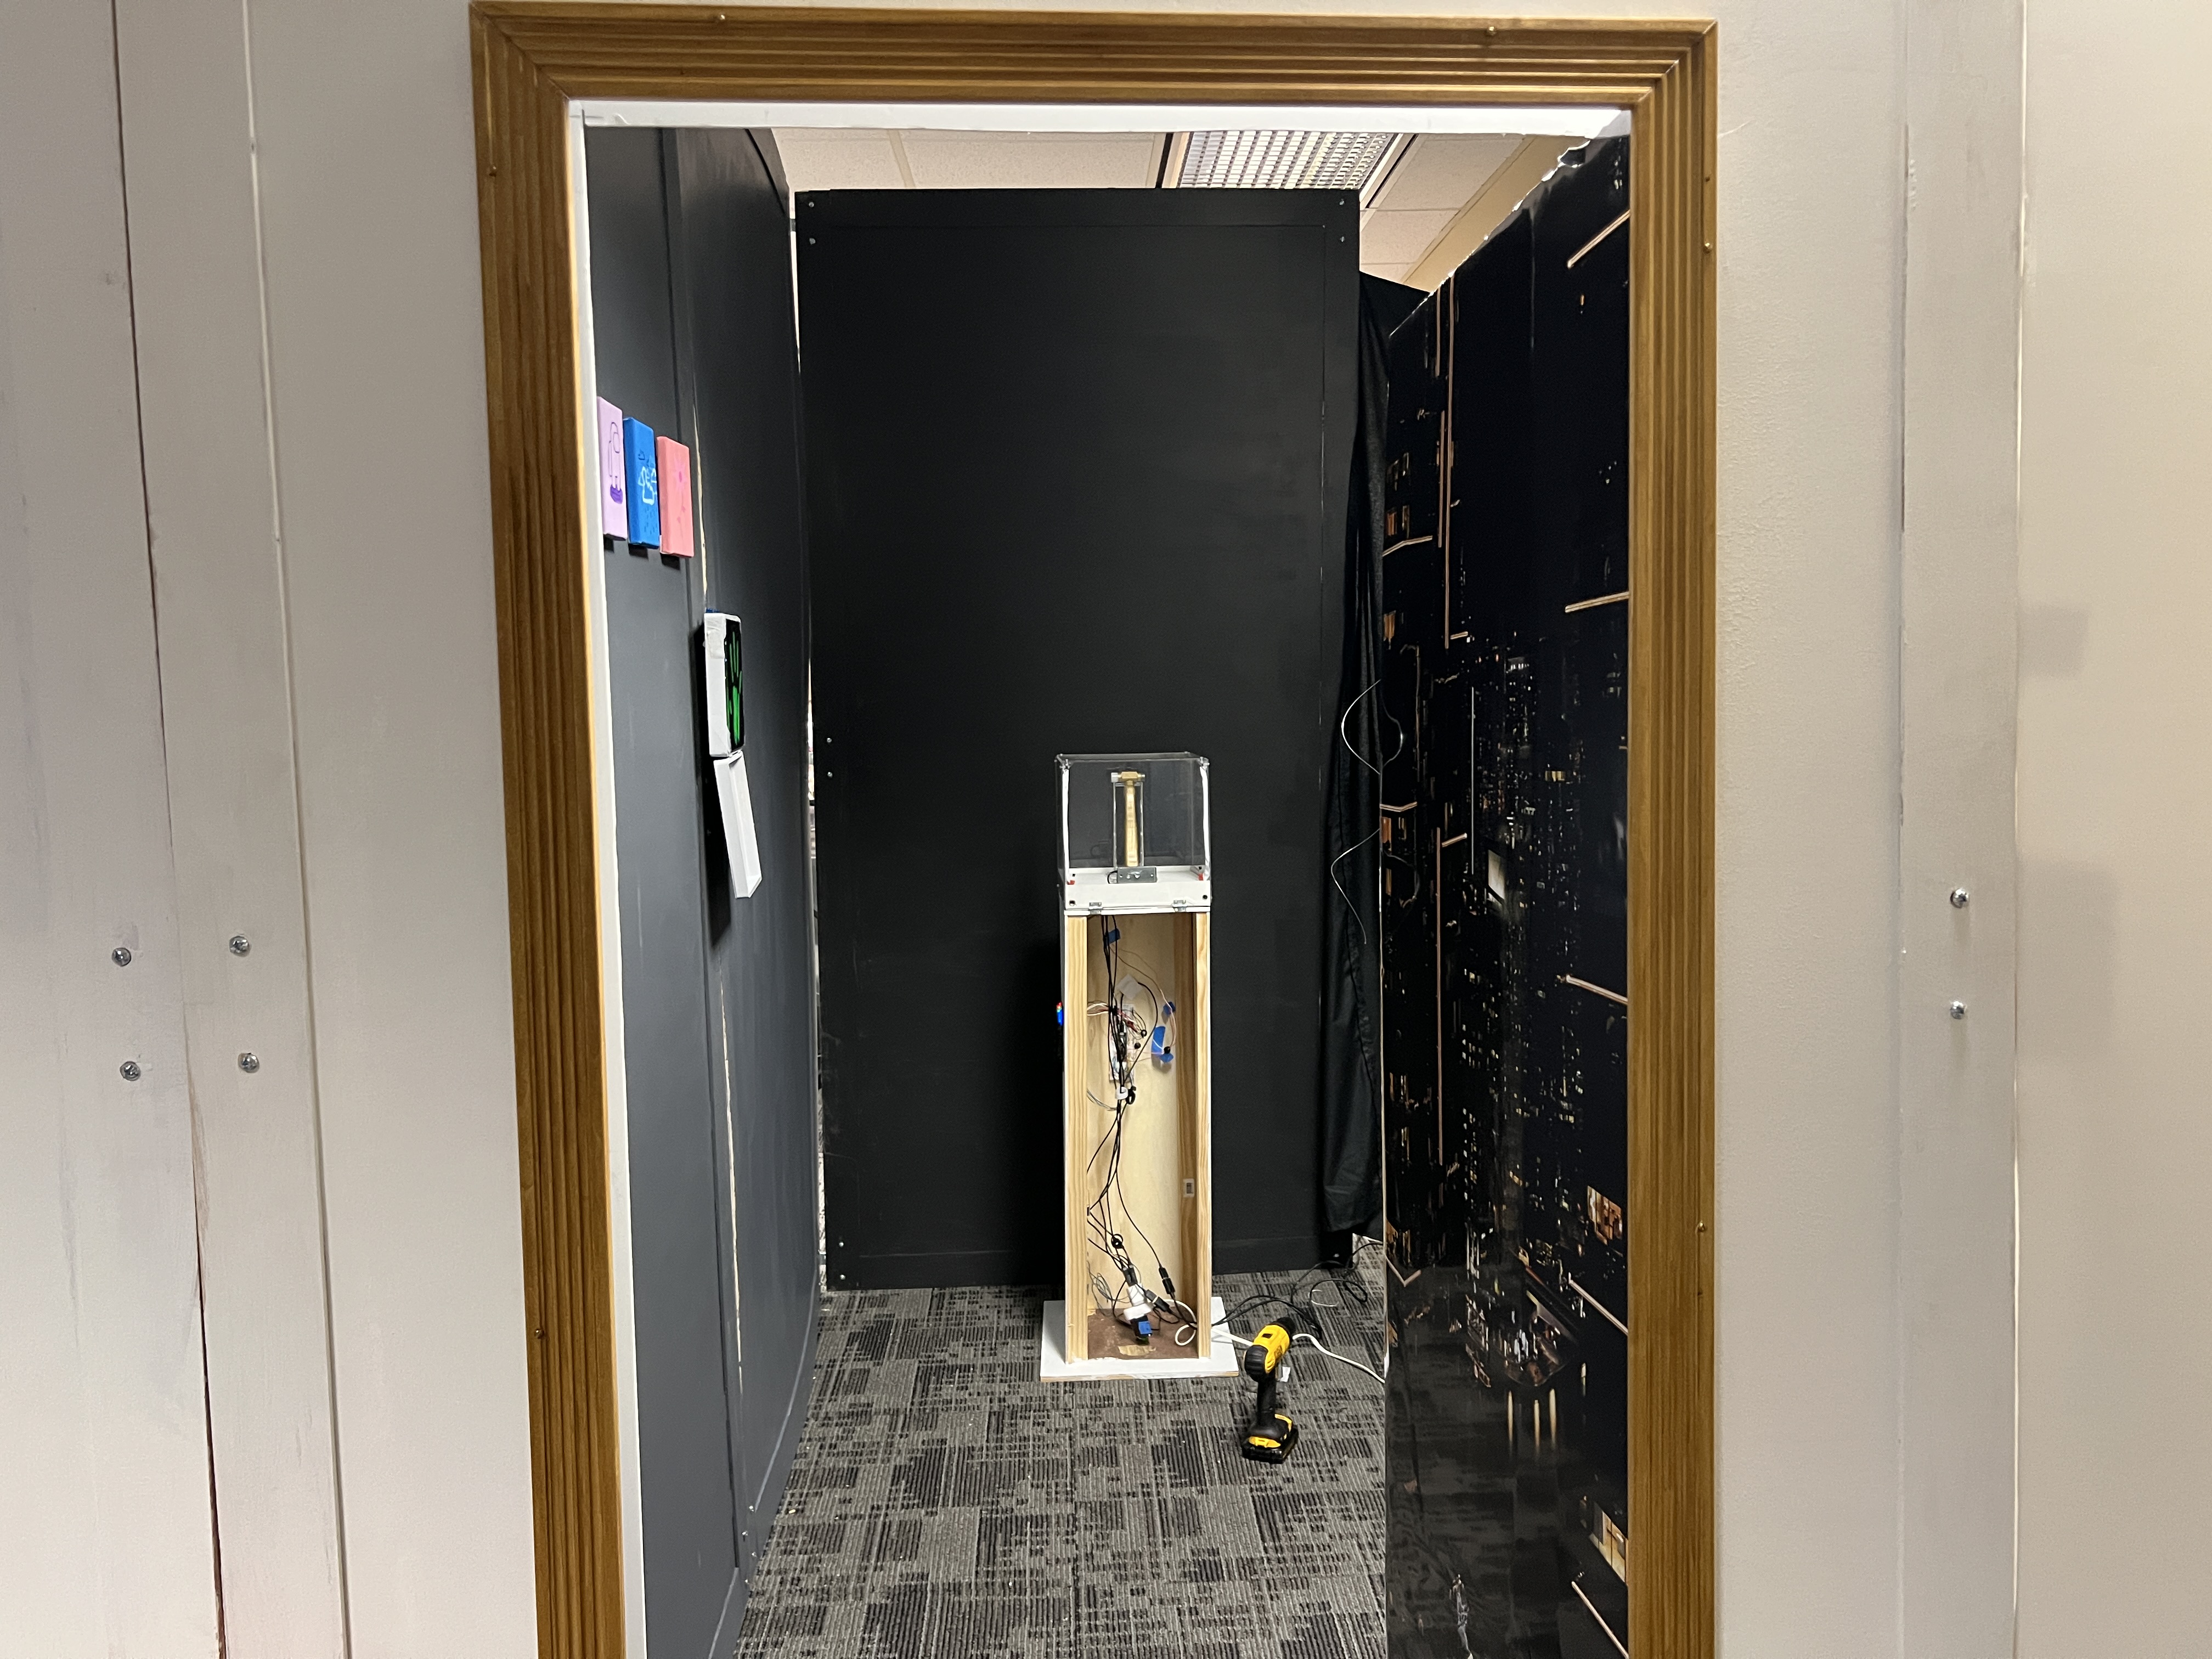
Secret Painting Door
Jan-May 2023
For my museum themed escape room, I designed and built this 'secret painting' door that would get triggered once the players solved a puzzle. Before the door is opened, it looks like a normal painting, blending in with the many other paintings in the room, but after the players trigger a switch to disable the electromagnets holding the door closed, they can step through the frame to the secret vault behind the wall.

Escape Room Painting Timer
Jan-May 2023
I designed and built this backlit projection screen so that the timer for my museum themed escape room could be themed like a Mondrian painting. The frame was made of cotton fabric stapled to trim pieces. The projector showed a timer website that was synced across the internet so we could control it remotely. The timer not only showed how much of the one hour participants had left, but also which of the three objectives they had completed.
Breakable Star Plates Props
Sep-Nov 2022
The theatre production 'Silent Sky' calls for a 'glass' plate that can be broken on the floor when the actor dramatically drops it in shock. Along with another engineer, we accomplished this by laser cutting pieces of 1/16 inch acrylic almost all the way through so they would break along the cracks when dropped. We also used some spray frost effect to make the edges frosted to make them more refined.
Folding Walls Set Piece
Sep-Nov 2022
I designed this multifunctional set piece for both the observatory and house settings in 'Silent Sky'. It's made of four foam panels that are hinged together. The observatory side is a faux wood texture that I painted, and the house side is peel and stick wallpaper. The wood trim on the sides was made by cutting a groove into a 1x2 using the table saw, and it keeps the foam panels from warping. The scene transition is done by two people and relatively fast.
Boat Set Piece
Sep-Nov 2022
I designed and built this set piece to represent an ocean liner in the play 'Silent Sky'. The design is two mirrored pieces that are each made of two geometric shapes made of foam glued together. It's extremely light, making scene transitions easy. I cut holes into the inside sides of the pieces so they were easier to carry. I modeled it in SolidWorks first and then exported drawings to help me cut out the pieces.
Autonomous Underwater Robot
Mar-Apr 2022
In my Experimental Engineering class, I worked with three other people to make an autonomous underwater robot. PVC tubes were used for the frame, and the electronics were kept in a sealed box with penetrators allowing access to the external sensors. We used a pressure sensor and thermistor for data collection, and microphones for navigation towards a speaker. The algorithm for navigation detected which of the microphones detected a chirp from the speaker first and turned in that direction. We tested our robot in a lake and at the beach. Unfortunately, the water flowing past the microphones seemed to continuously cause them to peak so navigation was unsuccessful, but we still got data and kept our electronics dry!
Temporary Walls
Apr-May 2022
As club president of my college’s escape room club, I’m responsible for a lot of the infrastructure details of the escape room. One challenge was to divide one classroom into multiple rooms so that players could progress from one area of the room to another. These dividers needed to be lightweight, easy to set up, and free-standing (we were not allowed to attach anything to the walls or floors of the classroom). The solution I ended up at used large 0.25” thick foam boards reinforced with thin plywood around the edges, attached with custom PVC and wood spacers. The walls were arranged in a T shape to prevent them from tipping over. The door from one room to another was a foam panel with a 1x4 frame that fell away from the players into the next room once they solved a puzzle. The door was held in place with an electromagnet, and players needed to trigger two hall effect sensors with “bombs” to “explode” the wall.
Solar Powered Smoothie Cart
Mar 2021-Apr 2022
I led the design and build of a solar-powered smoothie cart used to promote sustainability at events by using solar power to power a blender to make free smoothies. A group of four and I designed it in SolidWorks remotely and a similar sized (but different) group and I bought materials and built our design once we returned to campus in the fall of 2021. The design is able to fold the three solar panels up or down depending if it was being charged or stored. It also has a cabinet unit that stores the battery, charge controller, and inverter.
Amazon Lab126 Autonomous Robot
September 2021-May 2022
As my junior year capstone project, I and a team of four other students are developing an autonomous robotic solution to take repetitive audio data measurements. The robot uses its omnidirectional wheels to navigate and localize itself within a household environment after being given a LiDAR constructed map of the room. Ultimately, two robots will operate simultaneously in a room, where one would hold a speaker and another would hold a microphone. Together, they will visit every combination of positions in a grid, taking audio room impulse response data at each position. An adjustable mount is also being designed to hold a variety of equipment, including a mannequin.
Kinetic Sculpture
March 2022
As part of my mechanical design class, I worked with a team of 4 to create this machine that plays the xylophone when powered. The user turns a crank, which is geared up to drive a lead screw to translate the keys. The same input rotation is used to swing a mallet up and down so it strikes the keys as they pass by below. The purpose of this assignment was to gain familiarity with belts, pulleys, and lead screws.
CNC Machine Puzzle
February 2022
This puzzle was a tutorial for using the wood shop's ShopBot, a CNC milling machine. Six pieces were cut out of a sheet of wood, and they are able to be assembled together into a cube. I designed SolidWorks models of the parts to create outlines that could be imported into PartWorks. From there, a path was generated that included tabs and ramping as the bit plunged into and out of the wood. Careful consideration was given to the islands and the diameter of the cutting bit.
Treasure Chest
Nov-Dec 2021
Pirates of the Caribbean prop replica of Davy Jones' chest. I'm still working on designing and prototyping the mechanical elements that make parts of the chest move when you open and close it. I've completed one pass of what the outside will look like, including the construction process and the paint work in the context of how you would make a theatre prop. I learned a lot while doing this and I hope that all the mistakes I made will help make the next versions even better!
DDR
2019-Present
Student-made Dance Dance Revolution machine, including cabinet and 2 dance pads. This project is currently in progress. I am leading the building and mechanical engineering part, which includes planning and constructing the cab and the pad. Currently: we have a prototype of the pad, which is made of 12 identical parts that slot together. Still planning the cab, but current plans can be seen in the images.
Clock
Aug 2020
LED Matrix clock, with 3D printed frame and various hardware. I designed in SolidWorks and printed the frame with my Prusa for an 8x32 LED matrix. It's powered by an arduino. I ran into a lot of problems with the clock being too bright, so I added a piece of paper between the matrix and the holes on the outside.
Laptop Holder
Jul 2020
Laptop holder with capacity for 2 Macbook Airs that attaches to wall. I designed and 3D printed these 3 brackets, ran into some issues with bridging and supports, but overall it works fine. I added 45 degree supports just to make sure it would never fail and drop my computer.
Automatic Light Switch
Aug 2020
Voice command operated light switcher. I made this because I was too lazy to get up and turn off the lights when I was in bed. It works through my Google Home: I set up a custom command through IFTTT and had it send a signal to the Arduino, which turns a servo one way or another to turn the lights on or off. I had a few problems with the strength of the servo, which was just some random one that I had lying around and then somehow committed myself to using that one specifically. But I was able to add some mechanical advantage to make it work.
Robotics
2017-2019
First Robotics projects. I led my high school First Robotics team, so here are a collection of robots from that time. Our team was pretty small and pretty new, so I did a lot of the work in terms of designing and building the robot. These robots did tasks like stacking blocks, and collecting/depositing balls.
Pencil Holder
Apr 2017
Laser-cut plywood pencil holder. This was one of my bigger laser cutter projects, made completely from 1/8" plywood from JoAnn Fabric. I designed it all in Illusrtator and cut it out at my high school's laser cutter. I used a nodes method (one of my other projects - see below) where the parts that fit together were a bit too tight so you'd have to force them in and they would snap fit together. However, not all the fits were that tight so I ended up using a bit of wood glue on some parts. the inserts that divide the tall part and the short part into different sections are removable. There's also a ruler holder on the front, which incidentally also decided for me how long the whole thing was going to be (1 foot).
Headphones Holder
Nov 2017
Under-desk headphones holder. I wanted something to hang my headphones on that wouldn't take up any of my desk space. I designed it in Rhino, printed it at my school's fancy 3D printer, and primed/painted it. I also made a smaller version to test paint on. I must have done at least 8 coats of primer and paint, because I'd keep sanding it to try to get rid of the layer lines. There's a hole in the back to route my wires through, and there are indents in the top to fit command strips (I didn't want to screw into my desk). It served me well for years, though the paint did rub off after a while.
Trebuchet
Nov 2018
Wooden laser-cut trebuchet, for my brother's birthday. It has a basket to put something heavy in, and a little wheel that could wind up a string. Put something small in the basket, release the string, and off it goes. I gave it to him unassembled, as a challenge.
Ferris Wheel
Oct 2017
My biggest laser cutter project, with all the colors of acrylic available. It was completely made of 1/8" acrylic, no glue, all snap fits. The cars were the hardest part - I wanted them curved but obviously the laser cutter only makes flat parts. I tried a lot of different things - started with several simple interlocking layers, tried out some kerfing, and finally ended up on a complex 8-part piece with super thin parts that snapped all the time, but when it worked, it was so satisfying to snap together.
Eiffel Tower
Jan 2017
Laser cut acrylic Eiffel Tower. One of my first laser cutting projects, making a 3D shape out of cut out 2D pieces. I didn't use any 3D modeling software to visualize it, I just went for it. The stand is two clear pieces that slot together, and the ten blue pieces stack on top of the stand.
Nodes
2017
Laser cutter calibration test with this specific type of 1/8" plywood. The idea is that the rounded bits on the pieces make it so they snap fit together. The number engraved on the pieces is the width of that rounded bit. For this wood at some specific settings, it was 1/140" that would make a nice snap fit.